Install in an air-gapped environment
This topic explains how to use Helm to install the Harness Self-Managed Enterprise Edition in an air-gapped environment and how to obtain and transfer Docker images to a private registry with secure access. The steps include pulling Docker images, saving images as .tgz files, uploading to Google Cloud storage, downloading Helm charts, and pushing charts to your private repositories. This process ensures secure and seamless deployment of the Harness Self-Managed Enterprise Edition in restricted, offline environments.
Air-gapped environments are characterized by a lack of direct access to the internet, which provides an added layer of security for sensitive data and systems. This isolation poses unique challenges to deploy and update software applications, as standard methods of accessing resources, such as Docker images, are not possible.
The Harness Self-Managed Platform is designed to cater to various deployment scenarios, including an air-gapped environment. To facilitate this, the platform provides a secure and efficient method for obtaining and transferring Docker images to a private registry. This ensures that you can access, download, and push the required resources within your restricted network.
Workstation requirements
A minimum of 150GB of free disk space to download and extract the Harness airgap bundle
ECR/GCR/private registry details to tag and push images
Kubernetes cluster
Latest version of Helm
Access to Helm charts or download locally
Access to the Harness airgap bundle on GCP
Kubernetes version 1.22+ (Harness recommends v1.23.x)
Installation workflow
The flowchart below shows the air-gapped environment installation workflow steps.
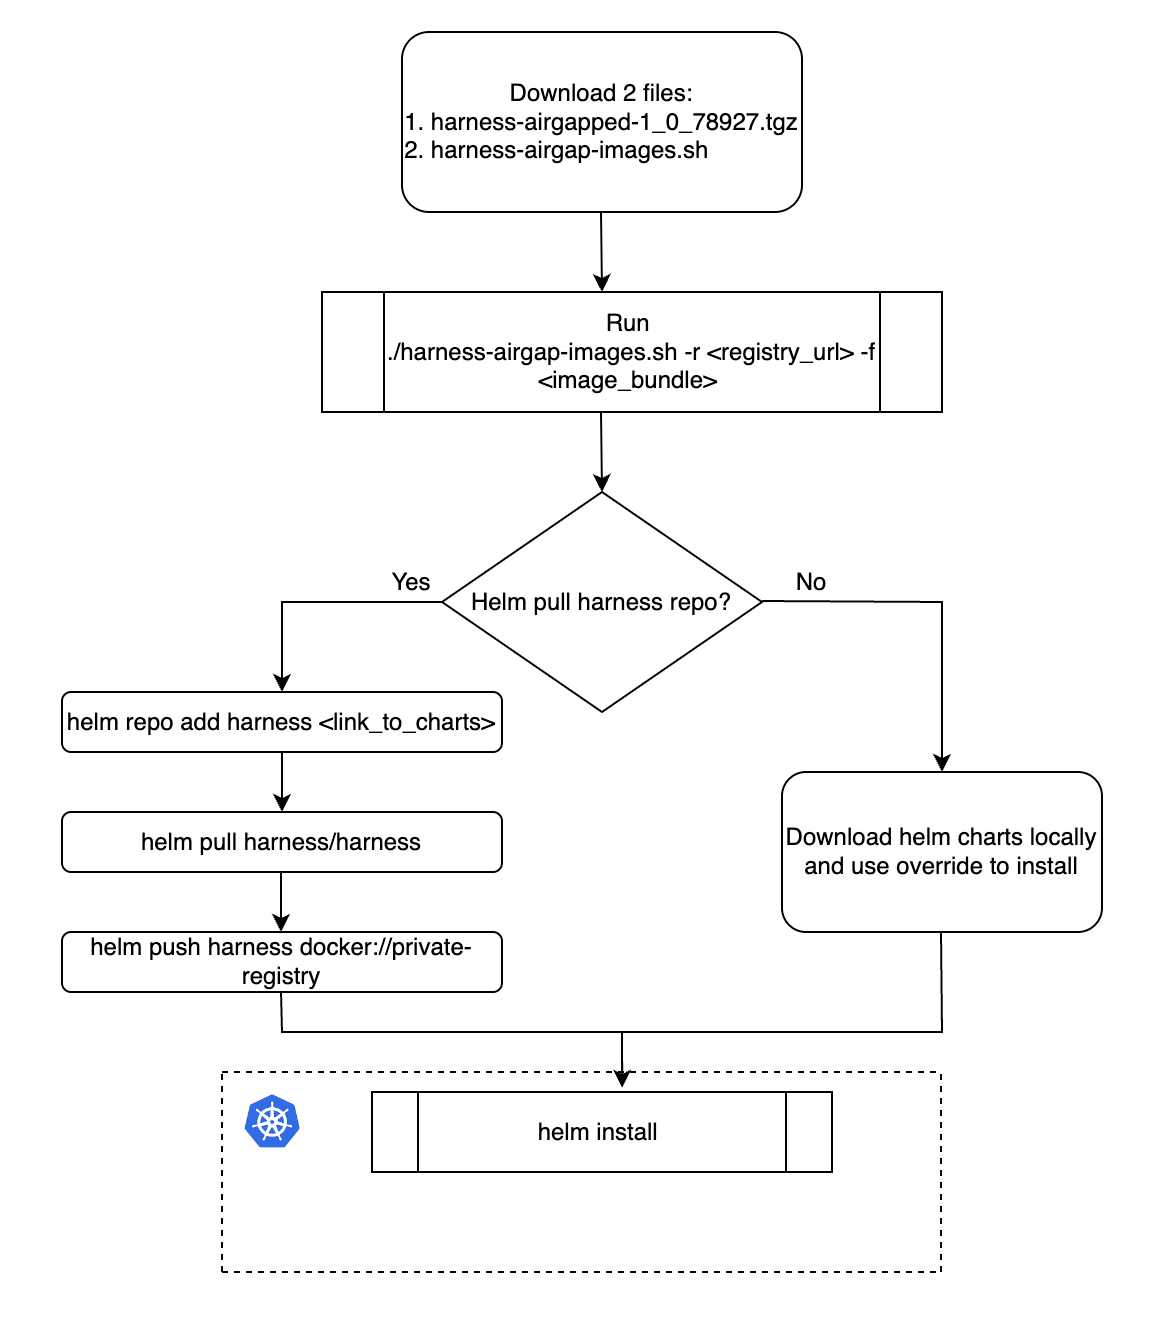
Download required files
To begin your installation, download the following files:
- Harness air-gapped bundle harness-airgapped-1_0_78927.tgz
- Harness airgap images harness-airgap-images.sh
Save Docker images to your private registry
To save Docker images, do the following:
Sign in to your private registry.
#Authenticate with Docker for Docker Registry
docker login <registry-url>

#Authenticate with Google Cloud Platform for GCR
gcloud auth login

#Authenticate with AWS for ECR
aws ecr get-login-password --region <region> | docker login --username AWS --password-
All Docker files required to deploy Harness are stored in
harness-airgapped.tgz.Add the
harness-airgapped.tgzandharness-docker-images.txtto your air-gapped network. You can now push your images locally.Run
harness-airgap-images.sh../harness-airgap-images.sh -r <REGISTRY.YOURDOMAIN.COM:PORT> -f harness-airgapped.tgz
Download and push Helm charts
After you save Docker images to your private registry, you must download the Helm charts and push them to your repository.
To download and push Helm charts
You can use Helm to pull the chart and push it to your private repository or download the chart directly.
helm repo add harness https://harness.github.io/helm-charts
helm pull harness/harness
helm push harness docker://private-repo
To download the Helm chart
- Download the chart from the Harness repository.
Install via Helm
Next, you are ready to install via Helm by updating your override.yaml file with your private registry information.
To install via Helm, do the following:
- Update the
override.yamlfile with your private registry information.global:
imageRegistry: "private-123.com" - Run the Helm install command.
helm install my-release harness/harness -n <namespace> -f override.yaml