Deploy Helm charts
This topic describes how to deploy Helm charts in standard Helm syntax in YAML from a remote Git repo, HTTP Helm Repository, or cloud storage service (Google Cloud Storage, AWS S3).
This process is also covered in the Helm Chart deployment tutorial.
Before you begin
- Helm CD Quickstart
- The Chart Template Developer's Guide from Helm.
- The Helm charts repo on GitHub has many useful examples.
Important notes
- Harness does not support AWS cross-account access for ChartMuseum and AWS S3. For example, if the Harness Delegate used to deploy charts is in AWS account A, and the S3 bucket is in AWS account B, the Harness Cloud Provider that uses this Delegate in A cannot assume the role for the B account.
Supported platforms and technologies
See Supported Platforms and Technologies.
ChartMuseum binaries
Many Helm chart users use ChartMuseum as their Helm chart repository server.
- ChartMuseum binary v0.8.2: the default ChartMuseum binary used by Harness is v0.8.2.
- ChartMuseum binary v0.12.0: to use ChartMuseum binary v0.12.0 you must enable the feature flag
USE_LATEST_CHARTMUSEUM_VERSION. Contact Harness Support to enable the feature.
Helm OCI Chart Registry Support
Harness supports the following Helm OCI chart registries:
- Amazon ECR
- Azure Container Registry
- DockerHub
- JFrog Artifactory
- Google Artifact Registry (coming soon)
Helm OCI chart support includes the following deployment types:
- Native Helm
- Helm charts with Kubernetes deployments.
Harness OCI chart registry support details:
- You can use the Harness Helm OCI connector to authenticate Harness with any OCI compliant repository.
- Harness can fetch the list of chart versions for a respective Helm chart. These versions can be passed at runtime as a parameter into the service.
- You can define expressions for the Chart Name and Path settings, and, at runtime, Harness will resolve those expressions and let you pick a version.
Important notes
- You cannot be trigger pipelines using the On New Manifest trigger if your service uses the OCI Helm connector.
Visual summary
Here's a quick video showing you how to add different types of manifests. It also describes how to add Helm charts and multiple values YAML files in the same repo as the chart, or in separate repos.
Artifacts and Helm charts
Harness supports image artifacts with Helm charts in the following ways.
Helm chart with hardcoded artifact
The image artifact is identified in the Helm chart values.yaml file. For example:
...
containers:
  - name: nginx
    image: docker.io/bitnami/nginx:1.21.1-debian-10-r0
...
If the image is hardcoded then you do not use the Artifacts section of the service. Any artifacts added here are ignored.
Helm chart using artifact added to the stage
You add an image artifact to the Artifacts section of the service and then reference it in the Helm chart values.yaml file.
Artifacts in the Artifacts section are referenced using the <+artifact.image> expression. For example:
...
image: <+artifact.image>
pullPolicy: IfNotPresent
dockercfg: <+artifact.imagePullSecret>
...
This is the same method when using artifacts with standard Kubernetes deployments. See Add Container Images as Artifacts for Kubernetes Deployments.
Add the Helm chart
Adding a Helm chart is a simple process of connecting Harness to the Git or HTTP Helm repo where your chart is located.
In your CD stage, click Service.
In Service Definition, select Kubernetes.
In Manifests, click Add Manifest.
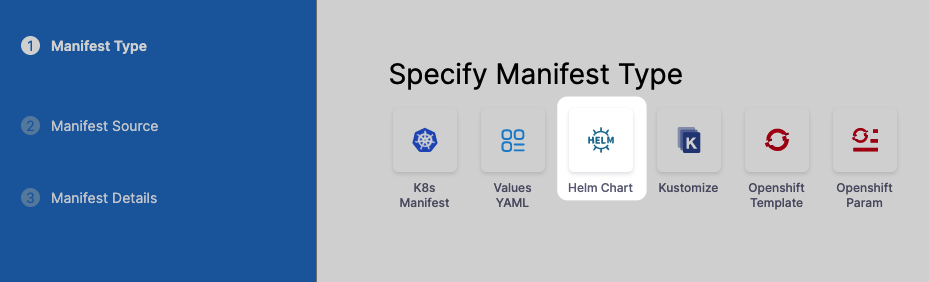
In Specify Manifest Type, select Helm Chart, and click Continue.
In Specify Helm Chart Store, select the type of repo or or cloud storage service (Google Cloud Storage, AWS S3) you're using.
For the steps and settings of each option, see the Connect to an Artifact Repo How-tos.
If you are using Google Cloud Storage or Amazon S3, see Cloud Platform Connectors.
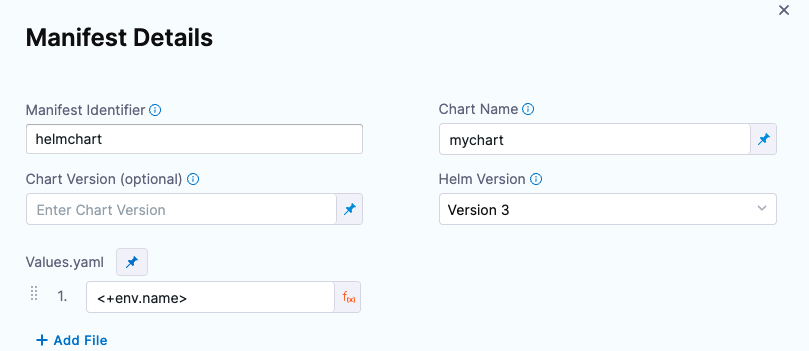
You can also use a local Helm chart if you are deploying the same Helm chart and version to many clusters/namespaces in parallel. For information, see Use a local Helm Chart. For all of the Helm Chart Store types (Git, GitHub, HTTP Helm, OCI, etc), you will need to provide the following Helm info:
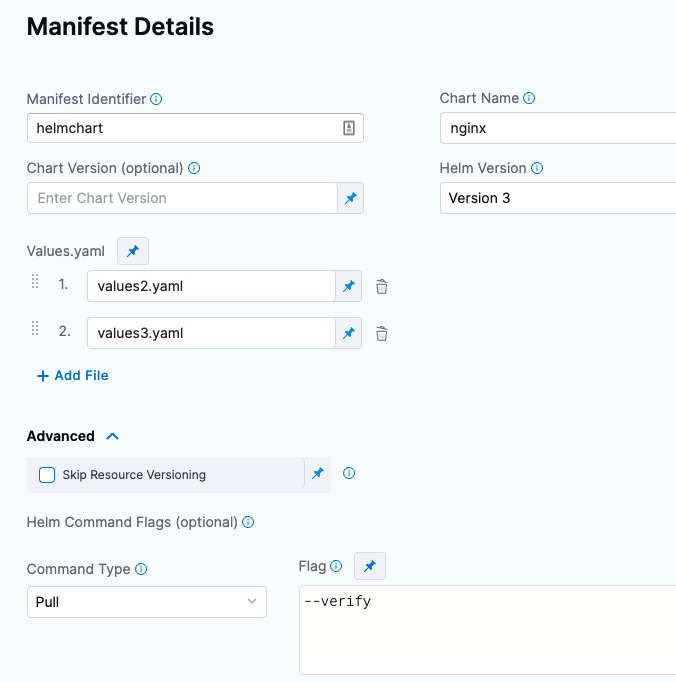
Manifest Identifier: Enter a name that identifies this Helm chart. It doesn't have to be the chart name. It can be the name of the service you are deploying or another name. Ex:
helm_chart.Chart name: Enter the name of the Helm chart for Harness to pull. Don't include the chart version. You will add that in the Chart Version setting. Ex:
todolist.Chart Version: Enter the version of the chart you want to deploy. This is found in the Chart.yaml
versionlabel in your chart. You can list all available versions of a chart using thesearch repocommand with the--versionsoption. See helm search repo from Helm.- If you leave Chart Version empty Harness gets the latest chart.
- If you are going to use a Harness trigger to run this pipeline when a new version is added to your chart repo, select the Runtime Input option. When you set up the trigger, you will select this chart and Harness will listen on the repo for new versions. See Trigger Pipelines on New Helm Chart. For example,
1.4.1.
Helm Version: Select the version of Helm used in your chart. See Helm Version Support Policy from Helm. For example,
Version 2.Values YAML: Your chart will have a default values.yaml file in its root folder.
- If you do not enter a values.yaml in Values YAML, Harness uses the default values.yaml file in the root of the chart.
- If you want to use a different values.yaml file, enter the path to that file.
- For example, let's imagine a Helm Chart with the following Values YAML files:
- dev-values.yaml
- qa-values.yaml
- prod-values.yaml
- sample-chart/test-values.yaml
You can specify the values YAML file based using a path to the file within the retrieved Helm chart.
If you have additional values YAML files in the chart, and you want to use those to override some settings of the default values.yaml file for this deployment, you can enter the addition values YAML file(s) in Values YAML.
For each additional values YAML file, specify its location within this chart. Enter the location from the root of the chart to the values.yaml file.
If a values YAML file is located in a folder, enter the path from the root of the chart to the folder and values.yaml.
The values YAML file(s) must be in this chart. You cannot enter a location to a values YAML file in a chart located somewhere else.If you use multiple files in Values YAML, priority is given from the last file to the first file.
For example, let's say you have 3 files: the default values.yaml, values2.yaml added next, and values3.yaml added last.
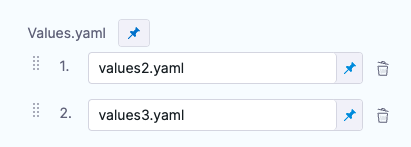
All files contain the same key:value pair.
The values3.yaml key:value pair overrides the key:value pair of values2.yaml and values.yaml files.
You can also select Expression and use Harness expressions in this setting. The resolved expression must be the name of a Values YAML file in the chart. For example, you could create a stage variable for values4.yaml named qa and then reference it in Values YAML like this:
<+stage.variables.qa>.Skip Resource Versioning: By default, Harness versions ConfigMaps and secrets deployed into Kubernetes clusters. In some cases, such as when using public manifests or Helm charts, you cannot add the annotation. When you enable Skip Resource Versioning, Harness will not perform versioning of ConfigMaps and secrets for the resource. If you have enabled Skip Resource Versioning for a few deployments and then disable it, Harness will start versioning ConfigMaps and secrets.
Helm Command Flags: You can use Helm command flags to extend the Helm commands that Harness runs when deploying your Helm chart. Harness will run Helm-specific Helm commands and their flags as part of preprocessing. All the commands you select are run before
helm install/upgrade.Command Type: Select the Helm command type you want to use. For example:
Flag: Add any options for the command. Ex:
--verify.
Here's an example:
If you haven't set up a Harness delegate, you can add one as part of the connector setup. This process is described in Helm CD Quickstart and Install a Kubernetes Delegate.
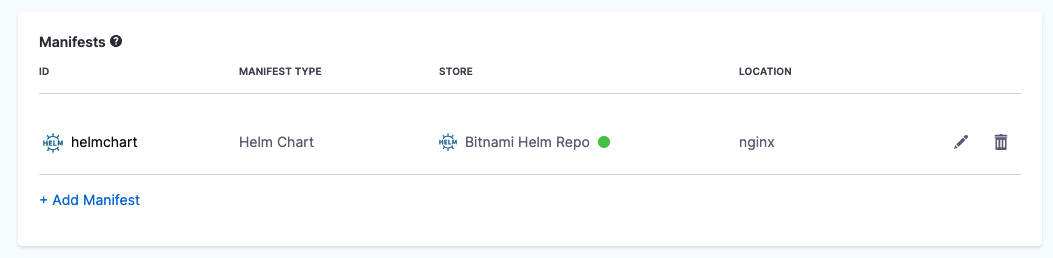
Once your Helm chart is added, it appears in the Manifests section. For example:
Using subcharts
You can specify a path to Helm charts within the Helm repository and Harness will fetch the Helm chart and its subordinate charts within that folder.

When you deploy, the logs will include all subcharts, like this:
  Successfully fetched following files:
  - Chart.yaml
  - values.yaml
  - charts/first-child/Chart.yaml
  - charts/first-child/values.yaml
  - charts/first-child/templates/deployment.yaml
  - charts/shared-lib/Chart.yaml
  - charts/shared-lib/templates/_service.yaml
  - charts/shared-lib/templates/_helpers.tpl
  - charts/shared-lib/templates/_deployment.yaml
  - templates/_helpers.tpl
  - README.md
Reference the artifact
If the image artifact is not hardcoded in the Helm chart, add the artifact in Artifacts and use the expression <+artifact.image> in your values.yaml. For example:
...
image: <+artifact.image>
pullPolicy: IfNotPresent
dockercfg: <+artifact.imagePullSecret>
...
This is the same method when using artifacts with standard Kubernetes deployments. For more information, go to Add Container Images as Artifacts for Kubernetes Deployments.
Override chart values YAML in service
You can override the values YAML in the Helm chart by adding multiple values YAML files when you add the chart.
If you use multiple files, priority is given from the last file to the first file.
For example, let's say you have 3 files: the default values.yaml, values2.yaml added next, and values3.yaml added last.
All files contain the same key:value pair. The values3.yaml key:value pair overrides the key:value pair of values2.yaml and values.yaml files.
Your values.yaml file can use Go templating and Harness built-in variable expressions.
See Example Kubernetes Manifests using Go Templating.
Override chart values YAML in environment
You can override the values YAML file for a stage's environment by mapping the environment name to the values file or folder. Next, you use the <+env.name> Harness expression in the values YAML path.
Let's look at an example.
Let's say there is a repo with three values YAML files, dev.yaml, qa.yaml. prod.yaml. In the Values YAML setting for the values file, you use the <+env.name> expression.
Next, in the environment setting, you add three environments, one for each YAML file name.
When you select an environment, such as qa, the name of the environment is used in File Path and resolves to qa.yaml. At runtime, the qa.yaml values file is used, and it overrides the values.yaml file in the chart.
Instead of selecting the environment in the Infrastructure each time, you can set the environment as a Runtime Input and then enter dev, qa, or prod at runtime.
Define the infrastructure and execution
There is nothing unique about defining the target cluster infrastructure definition for a Helm chart deployment. It is the same process as a typical Harness Kubernetes deployment.
For more information, go to Define Your Kubernetes Target Infrastructure.
Helm charts can be deployed using any of the execution steps and deployment strategies used in other Kubernetes deployments. For more information, go to Kubernetes How-tos.
Deploy
Each Helm chart deployment is treated as a release. During deployment, when Harness detects that there is a previous release for the chart, it upgrades the chart to the new release.
In your pipeline, click Run.
The Helm chart deployment runs.
You will see Harness fetch the Helm chart. Here is an example:
Helm repository: Bitnami Helm Repo

Chart name: nginx

Chart version: 9.4.1

Helm version: V3

Repo url: https://charts.bitnami.com/bitnami

Successfully fetched values.yaml

Fetching files from helm chart repo

Helm repository: Bitnami Helm Repo

Chart name: nginx

Helm version: V3

Repo url: https://charts.bitnami.com/bitnami

Successfully fetched following files:

- nginx/.helmignore
- nginx/charts/common/.helmignore
- nginx/charts/common/templates/validations/_postgresql.tpl
- nginx/charts/common/templates/validations/_cassandra.tpl
- nginx/charts/common/templates/validations/_mongodb.tpl
- nginx/charts/common/templates/validations/_mariadb.tpl
- nginx/charts/common/templates/validations/_validations.tpl
- nginx/charts/common/templates/validations/_redis.tpl
- nginx/charts/common/templates/_ingress.tpl
- nginx/charts/common/templates/_names.tpl
- nginx/charts/common/templates/_affinities.tpl
- nginx/charts/common/templates/_storage.tpl
- nginx/charts/common/templates/_utils.tpl
- nginx/charts/common/templates/_errors.tpl
- nginx/charts/common/templates/_capabilities.tpl
- nginx/charts/common/templates/_secrets.tpl
- nginx/charts/common/templates/_warnings.tpl
- nginx/charts/common/templates/_tplvalues.tpl
- nginx/charts/common/templates/_images.tpl
- nginx/charts/common/templates/_labels.tpl
- nginx/charts/common/Chart.yaml
- nginx/charts/common/values.yaml
- nginx/charts/common/README.md
- nginx/Chart.lock
- nginx/templates/svc.yaml
- nginx/templates/health-ingress.yaml
- nginx/templates/ldap-daemon-secrets.yaml
- nginx/templates/tls-secrets.yaml
- nginx/templates/NOTES.txt
- nginx/templates/pdb.yaml
- nginx/templates/ingress.yaml
- nginx/templates/server-block-configmap.yaml
- nginx/templates/serviceaccount.yaml
- nginx/templates/hpa.yaml
- nginx/templates/servicemonitor.yaml

Done.
Next, Harness will initialize and prepare the workloads, apply the Kubernetes manifests, and wait for steady state.
In Wait for Steady State you will see the workloads deployed and the pods scaled up and running (the release name has been shortened for readability):
kubectl --kubeconfig=config get events --namespace=default --output=custom-columns=KIND:involvedObject.kind,NAME:.involvedObject.name,NAMESPACE:.involvedObject.namespace,MESSAGE:.message,REASON:.reason --watch-only

kubectl --kubeconfig=config rollout status Deployment/release-e008...ee-nginx --namespace=default --watch=true

Status : release-e008...ee-nginx   Waiting for deployment spec update to be observed...

Event  : release-e008...ee-nginx   Deployment   release-e008...ee-nginx   default     Scaled up replica set release-e008...ee-nginx-779cd786f6 to 1   ScalingReplicaSet

Status : release-e008...ee-nginx   Waiting for deployment spec update to be observed...

Status : release-e008...ee-nginx   Waiting for deployment "release-e008...ee-nginx" rollout to finish: 0 out of

Event  : release-e008...ee-nginx   ReplicaSet   release-e008...ee-nginx-779cd786f6   default   Created pod: release-e008...ee-nginx-779n765l   SuccessfulCreate

Status : release-e008...ee-nginx   Waiting for deployment "release-e008...ee-nginx" rollout to finish: 0 of 1 updated replicas are available...

Event  : release-e008...ee-nginx   Pod   release-e008...ee-nginx-779n765l   default   Successfully assigned default/release-e008...ee-nginx-779n765l to gke-doc-account-default-pool-d910b20f-argz   Scheduled

Event  : release-e008...ee-nginx   Pod   release-e008...ee-nginx-779n765l   default   Pulling image "docker.io/bitnami/nginx:1.21.1-debian-10-r0"   Pulling

Event  : release-e008...ee-nginx   Pod   release-e008...ee-nginx-779n765l   default   Successfully pulled image "docker.io/bitnami/nginx:1.21.1-debian-10-r0" in 3.495150157s   Pulled

Event  : release-e008...ee-nginx   Pod   release-e008...ee-nginx-779n765l   default   Created container nginx   Created

Event  : release-e008...ee-nginx   Pod   release-e008...ee-nginx-779n765l   default   Started container nginx   Started

Status : release-e008...ee-nginx   deployment "release-e008...ee-nginx" successfully rolled out

Done.
You deployment is successful.
Versioning and rollback
Helm chart deployments support versioning and rollback in the same way as standard Kubernetes deployments.
For more information, go to Kubernetes Rollback.
Trigger the pipeline on a new chart version
You can set up a Harness trigger to listen on the chart repo and execute the pipeline when a new chart version appears. For more information, go to Trigger Pipelines on New Helm Chart.
Notes
Uninstall command flag
If you want to use the uninstall command in the Manifest Details, be aware of the following:
- When the deployment is successful, Harness won't execute this command.
- If the deployment fails on the very first execution, then Harness will apply the
--uninstallflag itself. You can see this in the logs underWait For Steady State. - If you want to pass in some command flags when Harness performs the
--uninstall, enter uninstall in Manifest Details and enter in the relevant command flags.