Add a Harness GitOps repository
This topic describes how to add a Harness GitOps Repository containing the declarative description of a desired state.
Harness GitOps Repositories are connections to repos containing the declarative description of a desired state. The declarative description can be in Kubernetes manifests, Helm Chart, Kustomize manifests, etc.
A Harness GitOps Repository is used for Harness GitOps only. For other Harness features like CI, CD Pipelines, etc, use a standard Git Connector.
Before you begin
If you are new to Harness GitOps, familiarize yourself with the following topics:
Supported platforms
- Currently, only Git platforms and HTTP Helm servers are supported in a GitOps Repository.
Add a Git repository
In the Repository setup, you will select the Agent to use when synching state. Be sure you have a GitOps Agent set up already.
See Install a Harness GitOps Agent.
You will also provide the credentials to use when connecting to the Git repository. Ensure you have your credentials available.
If you use a GitOps Repository Credentials Template with a GitOps Repository, then the repo path in the GitOps Repository must be a subfolder of the repo path in the Repository Credentials Template.
In your Harness Project, click GitOps, and then click Settings.
Click Repositories.
Click New Repository.
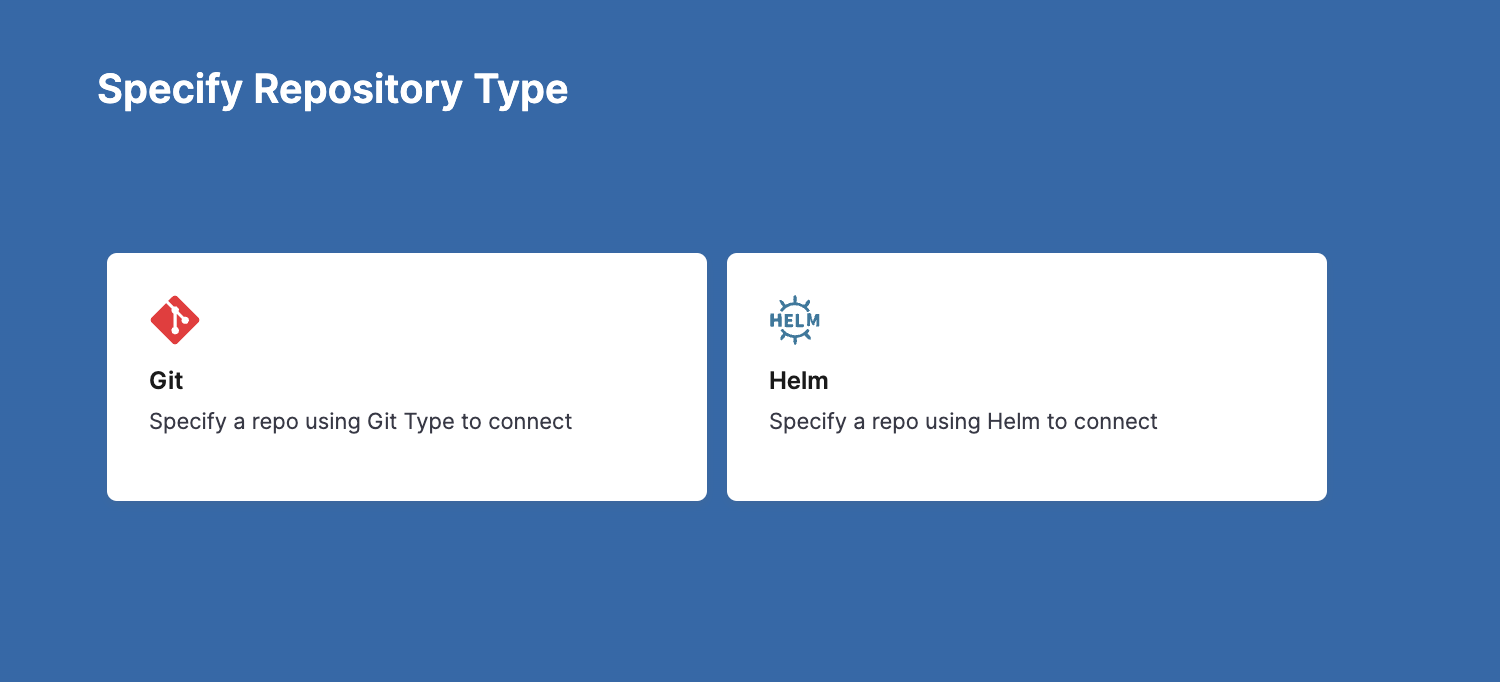
In Specify Repository Type, click Git or Helm.
Option: Git providers
Click Git.
In Repository Name, enter a name.
In GitOps Agent, select or create the Agent you want to use to fetch manifests from this repo. See Install a Harness GitOps Agent.
In Repository URL, enter the URL to your repo. For example,
https://github.com/argoproj/argocd-example-apps.git.Click Continue.
In Credentials, select one of the following:
Specify credentials for repository
- In Credentials, in Connection Type, select HTTPS, or SSH, or GitHub App.
- If you use Two-Factor Authentication for your Git repo, you connect over HTTPS or SSH.
- For SSH, ensure that the key is not OpenSSH, but rather PEM format. To generate an SSHv2 key, use:
ssh-keygen -t rsa -m PEMThersaand-m PEMensure the algorithm and that the key is PEM. Next, follow the prompts to create the PEM key. - For more information, see the ssh-keygen man page.
- HTTP also has the Anonymous option.
- For steps on setting up the GitHub App, see Use a GitHub App in a GitHub Connector.
- Click Save & Continue. Harness validates the connection.
- In Credentials, in Connection Type, select HTTPS, or SSH, or GitHub App.
Use a Credentials Template
Select the GitOps Credentials Template to use.
See Harness GitOps Repository Credentials Template.
If you use a Repository Credentials Template for GitOps Repository authentication, then the repo path in the GitOps Repository must be a subfolder of the repo path in the Repository Credentials Template.
For example, if you created a Repository Credentials Template for the URL
https://something.com, GitOps Repositories that have their URL ashttps://something.com/*are able to use that Repository Credentials Template.Harness will auto-detect the Repository Credentials Template (if any) based on the GitOps Repository URL and auto-populate it. If Harness auto-populated the GitOps Repository, then you cannot edit the Repository Credentials Template setting.
Skip Server Verification
Select this option to have the GitOps Agent skip verification of the URL and credentials.
Verification is only skipped when you create the GitOps Repository. Subsequent uses of the GitOps Repository are verified.
Enable LFS support
Select the option to use Git Large File Storage.
Proxy
A proxy for your repository can be specified in the Proxy setting.
Harness uses this proxy to access the repository. Harness looks for the standard proxy environment variables in the repository server if the custom proxy is absent.
An example repository with proxy:
apiVersion: v1
kind: Secret
metadata:
   name: private-repo
   namespace: cd
   labels:
      argocd.argoproj.io/secret-type: repository
   stringData:
      type: git
      url: https://github.com/argoproj/private-repo
      proxy: https://proxy-server-url:8888
      password: my-password
      username: my-username
Option: HTTP Helm Repository
Click Helm.
In Repository Name, enter a name.
In GitOps Agent, select or create the Agent you want to use to fetch charts from this repo. See Install a Harness GitOps Agent.
In Repository URL, enter the URL to your HTTP Helm Repository. For example,
https://charts.bitnami.com/bitnami.Click Continue.
In Credentials, select one of the following:
Specify Credentials for Repository
- In Credentials, in Connection Type, select HTTPS or SSH.
- If you use Two-Factor Authentication for your Git repo, you connect over HTTPS or SSH
- For SSH, ensure that the key is not OpenSSH, but rather PEM format. To generate an SSHv2 key, use:
ssh-keygen -t rsa -m PEM. Thersaand-m PEMensure the algorithm and that the key is PEM. Next, follow the prompts to create the PEM key. - For more information, see the ssh-keygen man page.
- HTTP also has the Anonymous option.
- Click Save & Continue. Harness validates the connection.
- In Credentials, in Connection Type, select HTTPS or SSH.
Use a Credentials Template
Select the GitOps Credentials Template to use.
See Harness GitOps Repository Credentials Template.
If you use a Repository Credentials Template for GitOps Repository authentication, then the repo path in the GitOps Repository must be a subfolder of the repo path in the Repository Credentials Template.
For example, if you created a Repository Credentials Template for the URL
https://something.com, GitOps Repositories that have their URL ashttps://something.com/*are able to use that Repository Credentials Template.Harness will auto-detect the Repository Credentials Template (if any) based on the GitOps Repository URL and auto-populate it. If Harness auto-populated the GitOps Repository, then you cannot edit the Repository Credentials Template setting.
Option: Skip Server Verification
Select this option to have the GitOps Agent skip verification of the URL and credentials.
Verification is only skipped when you create the GitOps Repository. Subsequent uses of the GitOps Repository are verified.
Step 3: Verify Connection
The connection is verified.
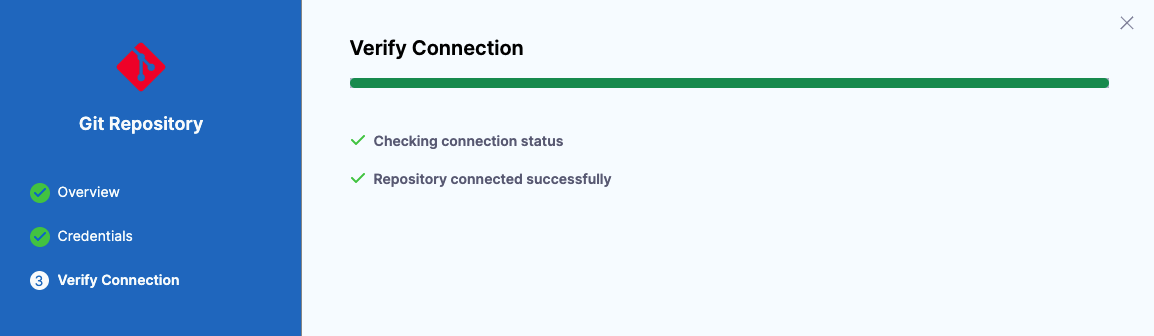
If you encounter errors, check that you have the correct repo URL and your authentication method has the required permissions.
- Click Finish. You now have a Harness GitOps Repository added.
