Set up a Microsoft Azure VM build infrastructure
Currently, this feature is behind the Feature Flag CI_VM_INFRASTRUCTURE. Contact Harness Support to enable the feature.
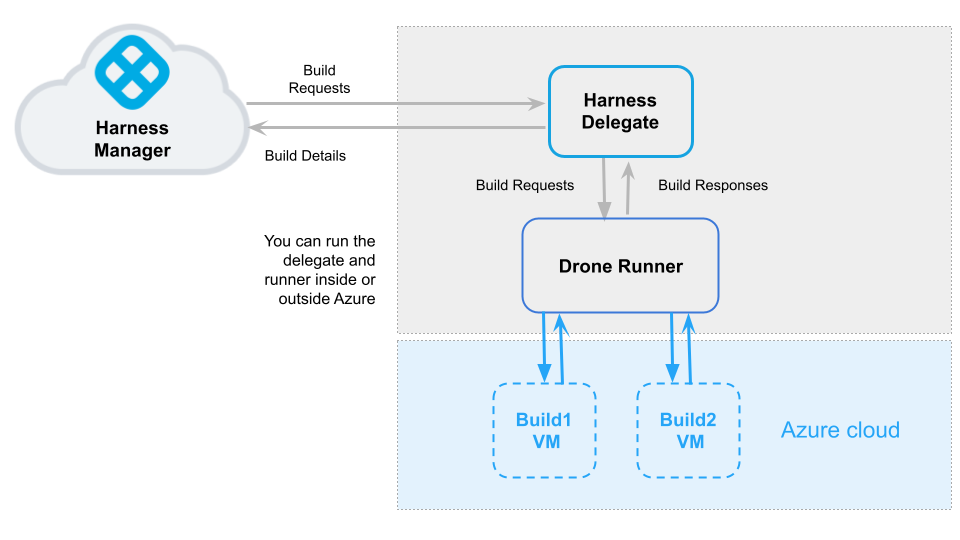
This topic describes how to set up a CI build infrastructure in Microsoft Azure. You will create a VM and install a CI Delegate and Drone Runner on it. The Delegate creates VMs dynamically in response to CI build requests.
For information on using Kubernetes as a build farm, see Set up a Kubernetes cluster build infrastructure.
The following diagram illustrates a build farm. The Harness Delegate communicates directly with your Harness instance. The VM Runner maintains a pool of VMs for running builds. When the Delegate receives a build request, it forwards the request to the Runner, which runs the build on an available VM.
Requirements
- VM requirements:
- For the Delegate VM, use a machine type with 4 vCPU and 16 GB memory or more.
- Harness recommends the Ubuntu Server 18.04 LTS image and a Microsoft Windows Server 2019 with Containers image. For additional details, go to Azure in the Drone docs.
- The VM must allow ingress access on ports 22 and 9079. Open port 3389 as well if you want to run Windows builds and be able to RDP into your build VMs.
- Azure requirements:
- You need permissions to create Azure Applications and VMs.
- An Azure Application that has the Owner role assigned to your VM. To assign a role to your VM, go to Virtual Machines. Then select your VM and go to Access Control (IAM).
- The Azure Application must be a Contributor on the subscription.
- To enable the runner to create new VMs, you need to specify the Application ID (
client_id),client_secret,subscription_id, and Directory ID (tenant_id).client_id: To find the client ID, go to App Registrations and then select your app.tenant_id: to find the tenant ID, go to App Registrations and then select your app.client_secret: To create a client secret, go to your app and click Certificates and Secrets.subscription_id: To find the subscription ID, go to the Virtual Machines page and select your delegate VM.
Step 1: Set Up the Delegate VM
Go to Virtual Machines and then launch the VM instance where the Harness Delegate will be installed.
Install Docker on the VM.
Install Docker Compose on the VM. You must have Docker Compose version 3.7 or higher installed.
Create a
/runnerfolder on your VM andcdinto it:mkdir /runner
cd /runner
Step 2: Configure the Drone Pool
The pool.yml file defines the VM spec and pool size for the VM instances used to run the Pipeline. A pool is a group of instantiated VM that are immediately available to run CI Pipelines.
- In the
/runnerfolder, create a newpool.ymlfile. - Set up the file as shown in the following examples. For information about specific settings, go to the Pool Settings Reference. You can also learn more in the Drone documentation about Drone Pool and Azure.
Example: pool.yml for Ubuntu 18.04
version: "1"
instances:
  - name: ubuntu-azure-pool
    default: true
    type: azure
    pool: 1
    limit: 4
    platform:
      os: linux
      arch: amd64
    spec:
      account:
        client_id: XXXXXXXXXXXXXXXXXXXX
        client_secret: XXXXXXXXXXXXXXXXXXXX
        subscription_id: XXXXXXXXXXXXXXXXXXXX
        tenant_id: XXXXXXXXXXXXXXXXXXXX
      location: eastus2
      size : Standard_F2s
      tags:
        tagName: tag
      image:
        username: azureuser
        password: XXXXXXXXXXXXXXXXXXXX
        publisher: Canonical
        offer: UbuntuServer
        sku: 18.04-LTS
        version: latest
Example: pool.yml for Windows Server 2019
version: "1"
instances:
- name: ubuntu-azure
  default: true
  type: azure
  platform:
    os: windows
  spec:
    account:
      client_id: XXXXXXX
      client_secret: XXXXXXX
      subscription_id: XXXXXXX
      tenant_id: XXXXXXX
    location: eastus2
    size: Standard_F2s
    tags:
      tagName: tag
    image:
      username: XXXXXXX
      password: XXXXXXX
      publisher: MicrosoftWindowsServer
      offer: WindowsServer
      sku: 2019-Datacenter-with-Containers
      version: latest
Later in this workflow, you'll reference the pool identifier in the Harness Manager to map the pool with a Stage Infrastructure in a CI Pipeline. This is described later in this topic.
Step 3: Configure the docker-compose.yaml file
- In your Harness account, organization, or project, select Delegates under Project Setup.
- Click New Delegate and select Switch back to old delegate install experience.
- Select Docker and then select Continue.
- Enter a Delegate Name. Optionally, you can add Tags or Delegate Tokens. Then, select Continue.
- Select Download YAML file to download the
docker-compose.yamlfile to your local machine.
Next, you'll add the Runner spec to the new Delegate definition. The Harness Delegate and Runner run on the same VM. The Runner communicates with the Harness Delegate on localhost and port 3000 of your VM.
Copy your local
docker-compose.yamlfile to the/runnerfolder on the VM. This folder should now have bothdocker-compose.yamlandpool.yml.Open
docker-compose.yamlin a text editor.Append the following to the end of the
docker-compose.yamlfile:drone-runner-aws:
restart: unless-stopped
image: drone/drone-runner-aws:latest
volumes:
- /runner:/runner
entrypoint: ["/bin/drone-runner-aws", "delegate", "--pool", "pool.yml"]
working_dir: /runner
ports:
- "3000:3000"Under
services: harness-ng-delegate: restart: unless-stopped, add the following line:network_mode: "host"Save
docker-compose.yaml.
Example: docker-compose.yaml with Runner spec
version: "3.7"
services:
harness-ng-delegate:
restart: unless-stopped
network_mode: "host"
deploy:
resources:
limits:
cpus: "0.5"
memory: 2048M
image: harness/delegate:latest
environment:
- ACCOUNT_ID=XXXXXXXXXXXXXXXX
- ACCOUNT_SECRET=XXXXXXXXXXXXXXXX
- MANAGER_HOST_AND_PORT=https://app.harness.io
- WATCHER_STORAGE_URL=https://app.harness.io/public/qa/premium/watchers
- WATCHER_CHECK_LOCATION=current.version
- REMOTE_WATCHER_URL_CDN=https://app.harness.io/public/shared/watchers/builds
- DELEGATE_STORAGE_URL=https://app.harness.io
- DELEGATE_CHECK_LOCATION=delegateqa.txt
- USE_CDN=true
- CDN_URL=https://app.harness.io
- DEPLOY_MODE=KUBERNETES
- DELEGATE_NAME=qwerty
- NEXT_GEN=true
- DELEGATE_DESCRIPTION=
- DELEGATE_TYPE=DOCKER
- DELEGATE_TAGS=
- DELEGATE_TASK_LIMIT=50
- DELEGATE_ORG_IDENTIFIER=
- DELEGATE_PROJECT_IDENTIFIER=
- PROXY_MANAGER=true
- VERSION_CHECK_DISABLED=false
- INIT_SCRIPT=echo "Docker delegate init script executed."
drone-runner-aws:
    restart: unless-stopped
    image: drone/drone-runner-aws:latest
    volumes:
      - /runner:/runner
    entrypoint: ["/bin/drone-runner-aws", "delegate", "--pool", "pool.yml"]
    working_dir: /runner
    ports:
      - "3000:3000"
For more information on Harness Docker Delegate environment variables, go to the Harness Docker Delegate environment variables reference.
Step 4: Install the Delegate and Runner
SSH into the Delegate VM and
cdto/runner.Confirm that the folder has both setup files, for example:
$ ls -a
. .. docker-compose.yml pool.yml
Run the following command to install the Delegate and Runner:
$ docker-compose -f docker-compose.yml up -dVerify that both containers are running correctly. You might need to wait a few minutes for both processes to start. You can run the following commands to check the process status:
$ docker ps
$ docker logs <delegate-container-id>
$ docker logs <runner-container-id>
In the Harness UI, verify that the Delegate appears in the Delegates list. It might take two or three minutes for the Delegates list to update. Make sure the Connectivity Status is Connected. If the Connectivity Status is Not Connected, make sure the Docker host can connect to
https://app.harness.io.
The Delegate and Runner are now installed, registered, and connected.
Step 5: Select pipeline build infrastructure
In your CI pipeline's Build stage, select the Infrastructure tab, and then select VMs.
In the Pool ID, enter the pool
namefrom your pool.yml.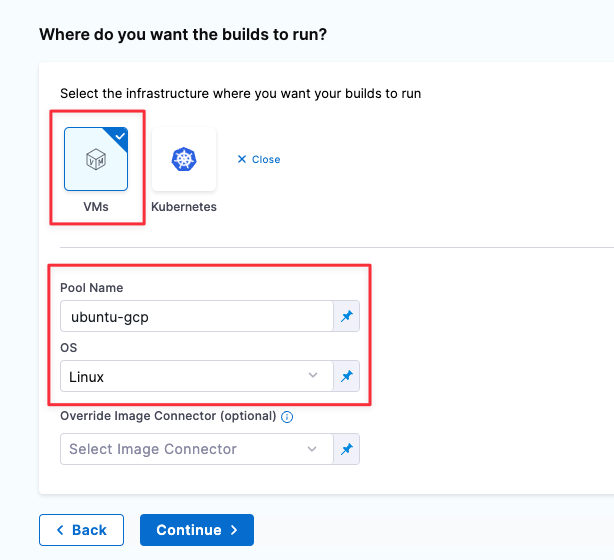
Save your pipeline.
This pipeline's Build stage now uses your GCP VMs for its build infrastructure.
Pool Settings Reference
See also Drone Pool and Azure in the Drone docs.
| Subfield | Description |
|---|---|
name (String) | Unique identifier of the pool. You reference the pool name in the Harness Platform when setting up the stage's build infrastructure. |
pool (Integer) | Minimum pool size number. Denotes the minimum number of cached VMs in ready state to be used by the Runner. |
limit (Integer) | Maximum pool size number. Denotes the maximum number of cached VMs in ready state to be used by the Runner. |
platform | Configure the details of your VM platform. |
spec | Configure the settings of your build VMs:
|
Troubleshooting
If you have problems running the delegate, runner, or VMs, you can collect debug and trace information in your container logs.
Create a
.envfile with the following options in your/runnerfolder:DRONE_DEBUG=true
DRONE_TRACE=trueShut down the delegate and runner:
docker-compose downIn your
docker-compose.ymlfile, update thedrone-runner-aws: entrypointto include the.envfile:drone-runner-aws:
restart: unless-stopped
image: drone/drone-runner-aws:1.0.0-rc.9
volumes:
- /runner:/runner
- /home/jsmith/.config/gcloud/:/key
entrypoint: ["/bin/drone-runner-aws", "delegate", "--envfile", ".env", "--pool", "pool.yml"]
working_dir: /runner
ports:
- "3000:3000"Restart the delegate and runner:
docker-compose up
See also
- Set up a Kubernetes cluster build infrastructure
- For more details on VM Runner, visit this GitHub page.
- Troubleshoot Continuous Integration