Set up an AWS VM build infrastructure
Currently, this feature is behind the Feature Flag CI_VM_INFRASTRUCTURE. Contact Harness Support to enable the feature.
This topic describes how to set up and use AWS VMs as build infrastructures for running builds and tests in a CI Stage. You will create an Ubuntu VM and install a Delegate on it. This Delegate will create new VMs dynamically in response to CI build requests. You can also configure the Delegate to hibernate AWS Linux and Windows VMs when they aren't needed.
For information on using Kubernetes as a build farm, go to Set up a Kubernetes cluster build infrastructure.
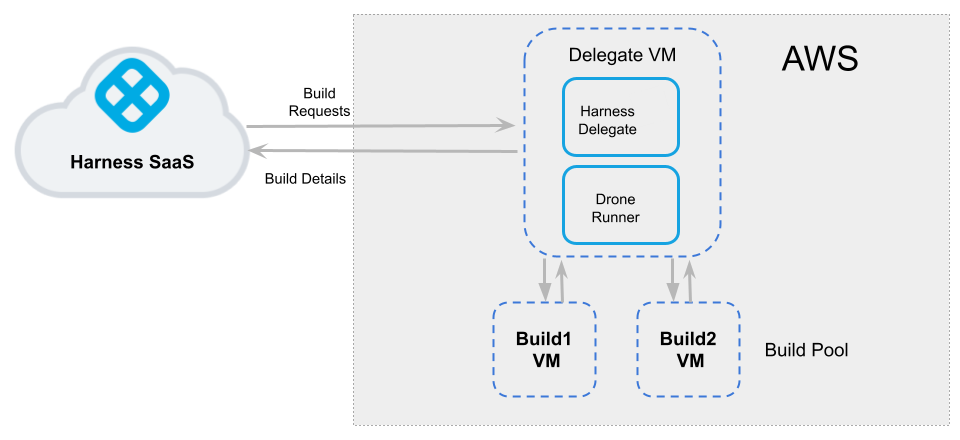
The following diagram illustrates an AWS build farm. The Harness Delegate communicates directly with your Harness instance. The VM Runner maintains a pool of VMs for running builds. When the Delegate receives a build request, it forwards the request to the Runner, which runs the build on an available VM.
Before you begin
This topic assumes you're familiar with the following:
- Building and testing on a Kubernetes cluster build infrastructure
- Delegates overview
- CI Build stage settings
- Harness key concepts
- Drone VM Runner
Alternate workflow: Use Terraform
If you have Terraform and Go installed on your EC2, you set up your build infrastructure as described in the Harness GitHub repo cie-vm-delegate.
Prerequisites
- AWS EC2 configuration:
- For the Delegate VM, use an Ubuntu t2.large (or higher) AMI.
- Build VMs can be Ubuntu, AWS Linux, or Windows Server 2019 (or higher).
- Authentication requirements:
- You can use an access key and access secret (AWS secret) for configuration of the Runner.
For Windows instances, you need to add the AdministratorAccess policy to the IAM role associated with the access key and access secret IAM. - You can also use IAM profiles instead of access and secret keys.
You need to run the Delegate VM with an IAM role that has CRUD permissions on EC2. This role will provide the Runner with temporary security credentials to create VMs and manage the build pool.
- You can use an access key and access secret (AWS secret) for configuration of the Runner.
- Set up VPC firewall rules for the build instances on EC2.
- For information on creating a Security Group, see Authorize inbound traffic for your Linux instances in the AWS docs.
- You also need to allow ingress access to ports 22 and 9079. Open port 3389 as well if you want to run Windows builds and be able to RDP into your build VMs.
- Once completed, you'll have a Security Group ID, which is needed for the configuration of the Runner.
Step 1: Set up the Delegate VM
- Log into the EC2 Console and launch the VM instance where the Harness Delegate will be installed.
- Install Docker on the instance.
- Install Docker Compose on your instance. You must have Docker Compose version 3.7 or higher installed.
- If you are using an IAM role, attach the role to the VM. See Attach an IAM Role to an Instance in the AWS docs.
- Create a
/runnerfolder on your VM andcdinto it:
mkdir /runner
cd /runner
Step 2: Configure the Drone pool on the AWS VM
The pool.yml file defines the VM spec and pool size for the VM instances used to run the pipeline. A pool is a group of instantiated VM that are immediately available to run CI pipelines. To avoid unnecessary costs, you can configure AWS Linux and Windows VMs to hibernate when not in use.
- In the
/runnerfolder, create a newpool.ymlfile. - Set up the file as described in the following example. Note the following:
- To avoid latency issues, set up your build pool in the same Availability Zone as the Delegate VM.
- Search for AMIs in your Availability Zone for supported models (Ubuntu, AWS Linux, Windows 2019+). AMI Ids differ depending on the Availability Zone.
- For more information about specific settings, go to the Pool settings reference. You can also learn more in the Drone documentation for Drone Pool and Amazon Runner.
Example: pool.yml
The following pool.yml example defines an Ubuntu pool and a Windows pool.
version: "1"
instances:
  - name: ubuntu-test-pool-july-five
    default: true
    type: amazon
    pool: 1
    limit: 4
    platform:
      os: linux
      arch: amd64
    spec:
      account:
        region: us-east-2
        availability_zone: us-east-2c
        access_key_id: XXXXXXXXXXXXXXXXX
        access_key_secret: XXXXXXXXXXXXXXXXXXX
        key_pair_name: XXXXX
      ami: ami-051197ce9cbb023ea
      size: t2.nano
      iam_profile_arn: arn:aws:iam::XXXX:instance-profile/XXXXX
      network:
        security_groups:
        - sg-XXXXXXXXXXX
  - name: windows-test-pool-july-six
    default: true
    type: amazon
    pool: 1
    limit: 4
    platform:
      os: windows
    spec:
      account:
        region: us-east-2
        availability_zone: us-east-2c
        access_key_id: XXXXXXXXXXXXXXXXXXXXXX
        access_key_secret: XXXXXXXXXXXXXXXXXXXXXX
        key_pair_name: XXXXX
      ami: ami-088d5094c0da312c0
      size: t3.large
      hibernate: true
      network:
        security_groups:
        - sg-XXXXXXXXXXXXXX
Later in this workflow, you'll reference the pool identifier in the Harness Manager to map the pool with a Stage Infrastructure in a CI Pipeline. This is described later in this topic.
Step 3: Configure the docker-compose.yaml file
- In your Harness account, organization, or project, select Delegates under Project Setup.
- Click New Delegate and select Switch back to old delegate install experience.
- Select Docker and then select Continue.
- Enter a Delegate Name. Optionally, you can add Tags or Delegate Tokens. Then, select Continue.
- Select Download YAML file to download the
docker-compose.yamlfile to your local machine.
Next, you'll add the Runner spec to the Delegate definition. The Harness Delegate and Runner run on the same VM. The Runner communicates with the Harness Delegate on localhost and port 3000 of your VM.
Copy your local docker-compose.yaml file to the
/runnerfolder on the AWS VM. This folder should now have bothdocker-compose.yamlandpool.yml.Open
docker-compose.yamlin a text editor.Append the following to the end of the
docker-compose.yamlfile:drone-runner-aws:
restart: unless-stopped
image: drone/drone-runner-aws
network_mode: "host"
volumes:
- ./runner:/runner
entrypoint: ["/bin/drone-runner-aws", "delegate", "--pool", "pool.yml"]
working_dir: /runnerUnder
services: harness-ng-delegate: restart: unless-stopped, add the following line:network_mode: "host"Save
docker-compose.yaml.
Example: docker-compose.yaml with Runner spec
version: "3.7"
services:
  harness-ng-delegate:
    restart: unless-stopped
    network_mode: "host"
    deploy:
      resources:
        limits:
          cpus: "0.5"
          memory: 2048M
    image: harness/delegate:latest
    environment:
      - ACCOUNT_ID=XXXXXXXXXXXXXXXX
      - DELEGATE_TOKEN=XXXXXXXXXXXXXXXX
      - MANAGER_HOST_AND_PORT=https://app.harness.io
      - WATCHER_STORAGE_URL=https://app.harness.io/public/qa/premium/watchers
      - WATCHER_CHECK_LOCATION=current.version
      - REMOTE_WATCHER_URL_CDN=https://app.harness.io/public/shared/watchers/builds
      - DELEGATE_STORAGE_URL=https://app.harness.io
      - DELEGATE_CHECK_LOCATION=delegateqa.txt
      - USE_CDN=true
      - CDN_URL=https://app.harness.io
      - DEPLOY_MODE=KUBERNETES
      - DELEGATE_NAME=qwerty
      - NEXT_GEN=true
      - DELEGATE_DESCRIPTION=
      - DELEGATE_TYPE=DOCKER
      - DELEGATE_TAGS=
      - DELEGATE_TASK_LIMIT=50
      - DELEGATE_ORG_IDENTIFIER=
      - DELEGATE_PROJECT_IDENTIFIER=
      - PROXY_MANAGER=true
      - VERSION_CHECK_DISABLED=false
      - INIT_SCRIPT=echo "Docker delegate init script executed."
  drone-runner-aws:
    restart: unless-stopped
    image: drone/drone-runner-aws:1.0.0-rc.38
    network_mode: "host"
    volumes:
      - .:/runner
    entrypoint: ["/bin/drone-runner-aws", "delegate", "--pool", "pool.yml"]
    working_dir: /runner
For more information on Harness Docker Delegate environment variables, go to the Harness Docker Delegate environment variables reference.
Step 4: Install the Delegate and Runner
SSH into the Delegate VM and
cdto/runner.Confirm that the folder has both setup files, for example:
$ ls -a
. .. docker-compose.yml pool.yml
Run the following command to install the Delegate and Runner:
$ docker-compose -f docker-compose.yml up -dVerify that both containers are running correctly. For example, wait a few minutes for both processes to start, and then run the following commands:
$ docker ps
$ docker logs <delegate-container-id>
$ docker logs <runner-container-id>
In the Harness UI, verify that the Delegate appears in the Delegates list. It might take two or three minutes for the Delegates list to update. Make sure the Connectivity Status is Connected. If the Connectivity Status is Not Connected, make sure the Docker host can connect to
https://app.harness.io.
The Delegate and Runner are now installed, registered, and connected.
Step 5: Select pipeline build infrastructure
In your CI pipeline's Build stage, select the Infrastructure tab, and then select AWS VMs.
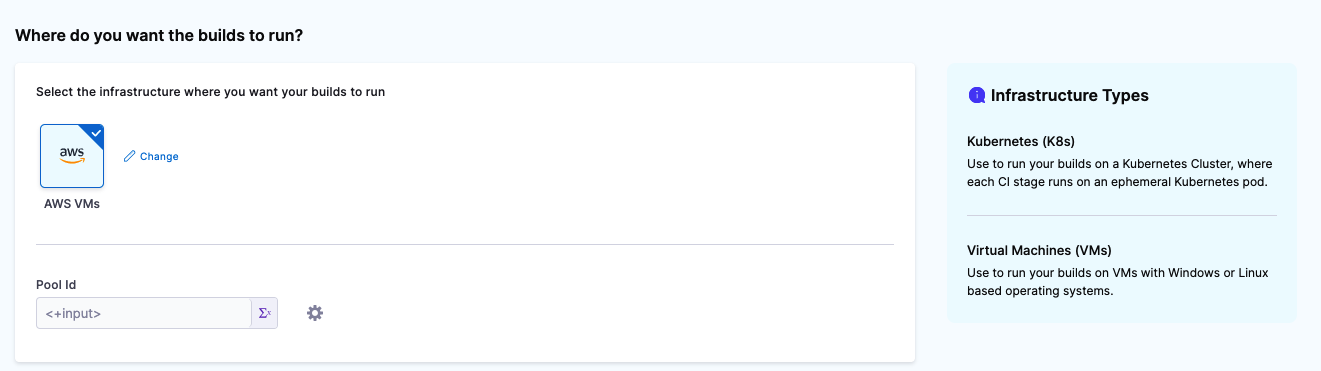
In Pool ID, enter the pool
namefrom your pool.yml.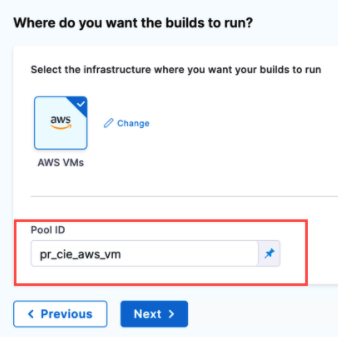
Save your pipeline.
This pipeline's Build stage now uses your AWS VMS for its build infrastructure.
Pool settings reference
You can configure the following settings in your pool.yml file.
| Subfield | Type | Example | Description |
|---|---|---|---|
name | String | name: windows_pool | Unique identifier of the pool. You'll reference this pool name in the Harness Manager later when setting up the CI build infrastructure. |
pool | Integer | pool: 1 | Pool size number. Denotes the number of cached VMs in ready state to be used by the Runner. |
limit | Integer | limit: 3 | Maximum pool size number. Denotes the maximum number of VMs that can be present at any instance to be used by the Runner. |
hibernate | Boolean | hibernate: true | When set to true (the default), VMs hibernate after startup. When false, VMs are always in a running state.This option is supported for AWS Linux and Windows VMs. Hibernation for Ubuntu VMs is not currently supported. For more information go to the AWS documentation: Hibernate your On-Demand Linux instance. |
iam_profile_arn | String | iam_profile_arn: arn:aws:iam::XXXX:instance-profile/XXX | Instance profile ARN of the IAM role to apply to the build instances. |
platform | Mapping, string | Go to Platform example | Configure the details of your VM platform. By default, the platform is set to Linux OS and AMD64 architecture. |
instance | Mapping, string or integer | Go to Instance example | Configure the settings of your AWS instance. disk contains AWS block information, and network contains AWS network information. For more information on these attributes, go to the AWS documentation: Create a security group. |
Platform example
os (String)
platform: os: windows
arch (String)
platform: arch:
variant (String)
platform: variant:
version (String)
platform: version:
os_name (String)
    instance:
      platform:
        os: linux
        arch: amd64
        os_name: amazon-linux
Instance Example
ami (String)
    instance:
      ami: ami-092f63f22143765a3
tags (String)
    instance:
      tags: 285
type (String)
    instance:
      type: t2.micro
disk
size(Integer)
        disk:
          size:
type(String)
        disk:
          type:
iops(String)
        disk:
          iops:
Network
vpc(Integer)
        network:
          vpc:
vpc_security_groups([ ] String)
        network:
          vpc_security_groups:
          - sg-0ad8xxxx511b0
security_groups([ ] String)
          network:
            security_groups:
              - sg-06dcxxxx9811b0
subnet_id(String)
        network:
          subnet_id: subnet-0ab15xxxx07b53
private_ip(Boolean)
        network:
          private_ip:
Runner settings reference
You can set the following Runner options in your docker-compose.yml file. These can be useful for advanced use cases such as troubleshooting the Runner.
Example: docker-compose.yml with Drone Environment Settings
version: "3.7"
services:
  harness-ng-delegate:
    restart: unless-stopped
    network_mode: "host"
    deploy:
      resources:
        limits:
          cpus: "0.5"
          memory: 2048M
    image: harness/delegate:latest
    environment:
      - MANAGER_HOST_AND_PORT=https://app.harness.io
      - WATCHER_STORAGE_URL=https://app.harness.io/public/qa/premium/watchers
      - WATCHER_CHECK_LOCATION=current.version
      - REMOTE_WATCHER_URL_CDN=https://app.harness.io/public/shared/watchers/builds
      - DELEGATE_STORAGE_URL=https://app.harness.io
      - DELEGATE_CHECK_LOCATION=delegateqa.txt
      - USE_CDN=true
      - CDN_URL=https://app.harness.io
      - DEPLOY_MODE=KUBERNETES
      - DELEGATE_NAME=qwerty
      - NEXT_GEN=true
      - DELEGATE_DESCRIPTION=
      - DELEGATE_TYPE=DOCKER
      - DELEGATE_TAGS=
      - DELEGATE_TASK_LIMIT=50
      - DELEGATE_ORG_IDENTIFIER=
      - DELEGATE_PROJECT_IDENTIFIER=
      - PROXY_MANAGER=true
      - VERSION_CHECK_DISABLED=false
      - INIT_SCRIPT=echo "Docker delegate init script executed."
  drone-runner-aws:
    restart: unless-stopped
    image: drone/drone-runner-aws:1.0.0-rc.38
    network_mode: "host"
    volumes:
      - .:/runner
    entrypoint: ["/bin/drone-runner-aws", "delegate", "--pool", "pool.yml"]
    working_dir: /runner
    environment:
      - DRONE_REUSE_POOL=false
      - DRONE_LITE_ENGINE_PATH=https://github.com/harness/lite-engine/releases/download/v0.5.2
      - DRONE_DEBUG=true
      - DRONE_TRACE=true
Configure the following fields in the .env file to allow Runner to access and launch your AWS VM.
| Field | Type | Description | Example |
|---|---|---|---|
DRONE_REUSE_POOL | Boolean | Reuse existing EC2 instances on restart of the Runner. | false |
DRONE_LITE_ENGINE_PATH | String | This variable contains the release information for the Lite Engine. The Lite Engine is a binary that is injected into the VMs with which the Runner interacts. It is responsible for coordinating the execution of the steps. | https://github.com/harness/lite-engine/releases/download/v0.0.1.12 |
DRONE_DEBUG | Boolean | Optional. Enables debug-level logging. | true |
DRONE_TRACE | Boolean | Optional. Enables trace-level logging. | true |
Troubleshooting
When you run the pipeline, if VM creation in the Runner fails with the error no default VPC, then set subnet_id in pool.yml.