Build, test, and publish a NodeJS app
In this tutorial, you'll create a Harness CI pipeline that builds, tests, and publishes a Node.js app.
If you don't have a Harness account yet, you can create one for free at app.harness.io.
What is Continuous Integration?
Continuous Integration is a DevOps process based on automated builds that are be triggered by some sort of event, such as a code check-in, merge, or a time schedule. According to Paul Duvall, co-author of Continuous Integration, CI should improve quality and reduce risk. Having a Continuous Integration approach removes the burden of manual builds and also makes builds more repeatable, consistent, and available.
Manual vs CI builds
When you build without a CI platform, you deliberately run commands to clone the codebase, install or configure dependencies, compile the code, run tests, and then, usually, package and publish an image to a container registry. When you need to build multiple times per day or you have tens, hundreds, or even thousands of developers running builds, you need the ability to run builds quickly and automatically on build infrastructure that is more substantial and diverse than a single developer's machine.
In a CI platform, such as Harness CI, you create a workflow or pipeline that includes the steps to build and package your application or service. You also specify where your source code exists (such as an SCM repo), and you ensure that the build infrastructure, such as a virtual machine or Kubernetes cluster, has all the required dependencies to build your code. The CI pipeline can then use this information to run builds automatically.
Sharing images
Eventually, the products of your builds are deployed somewhere, and the main goal of Continuous Integration is to build and publish a deployable unit, which can be referred to as an image, artifact, or release candidate.
A release candidate is the final form of an artifact to be deployed, and this often includes more than compiled source code. For example, there could be quality steps taken to produce the artifact, such as finding and fixing bugs. Additionally, packaging, distribution, and configuration all go into a release candidate.
Once you've prepared a release candidate, you want to share it with your teammates or customers. Like any file you want to share with the world, storing it externally makes it more accessible. There are many options for packaging and sharing images, such as Docker. A big benefit to the Docker packaging format is the broad ecosystem of Docker registries. Your organization might have a registry provider, or your can use a free registry, such as Docker Hub.
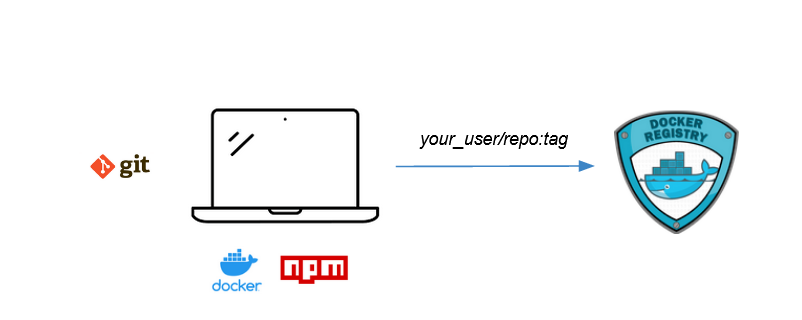
Optional exercise: Build locally
As an optional exercise, you can build the app used in this tutorial locally before creating a Harness CI pipeline to build and test it automatically.
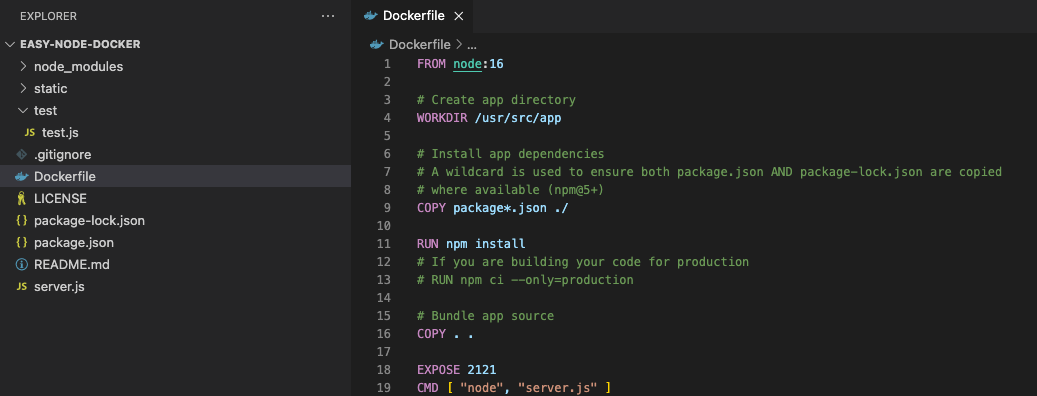
The codebase used in this tutorial is a simple NodeJS app that can be built into a Docker image. The Dockerfile has specifics on building and packaging the app.
To build this app locally:
Clone the easy node docker repo to your local machine.
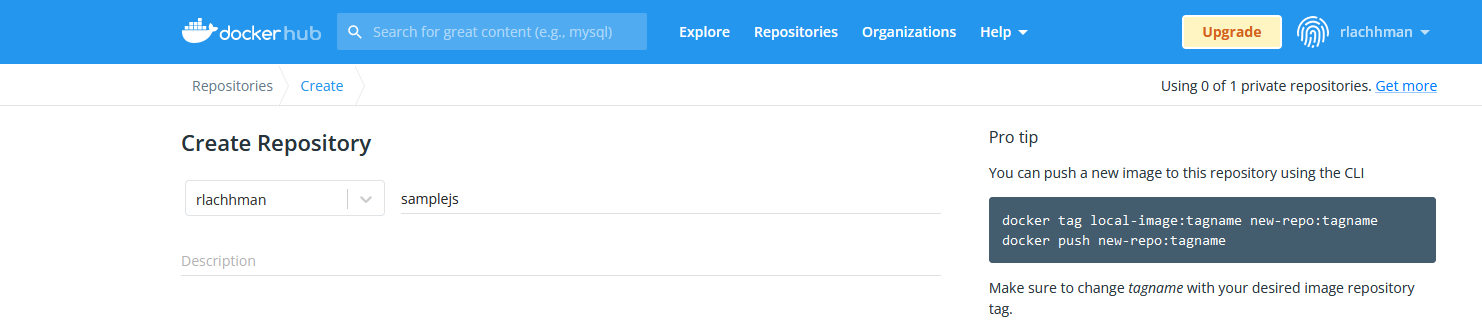
Create a Docker Hub account, if you don't already have a Docker registry account.
Create a repo in your Docker registry account where you can push your app image.
Use docker build to call the underlying npm install and start the build process. In the following example commands, replace the bracketed values with your Docker Hub or Docker registry username, the name of the repo where you want to push the image, and an appropriate image tag, such as
latest.docker build --tag [your_docker_username]/[your-docker-repo-name]:[tag] .
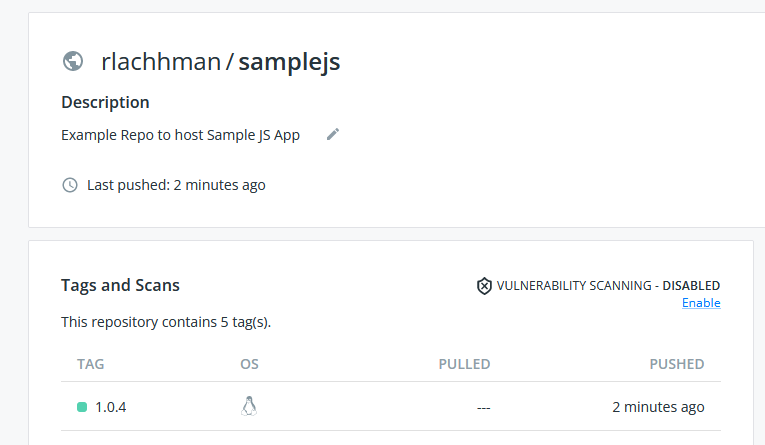
docker push [your_docker_username]/[your-docker-repo-name]:[tag]After the build and push commands run, you can verify that the image has been uploaded to your Docker repo. Can validate that this has been placed into the Docker Registry.
If you took a closer look at what your machine was doing during the local build, the machine was bogged down for a few moments. When building once, for yourself, that is fine, but the resource burden explodes when running multiple concurrent builds at scale to support tens, hundreds, or thousands of developers. Modern Continuous Integration platforms are designed to scale with distributed nodes. Harness CI is designed to scale and simplify the process of externalizing your build process into a CI pipeline. Replicating your workflows into Harness CI pipelines creates repeatable, consistent, and distributed build processes.
The remainder of this tutorial walks you through the process of creating a Harness CI pipeline that builds, tests, and publishes the NodeJS app that you just built manually.
Prepare the codebase
Fork the easy node docker tutorial repo into your GitHub account.
Create a GitHub personal access token with the
repo,admin:repo_hook, anduserscopes. For instructions, go to the GitHub documentation on creating a personal access token. For information about the token's purpose in Harness, go to the GitHub connector settings reference.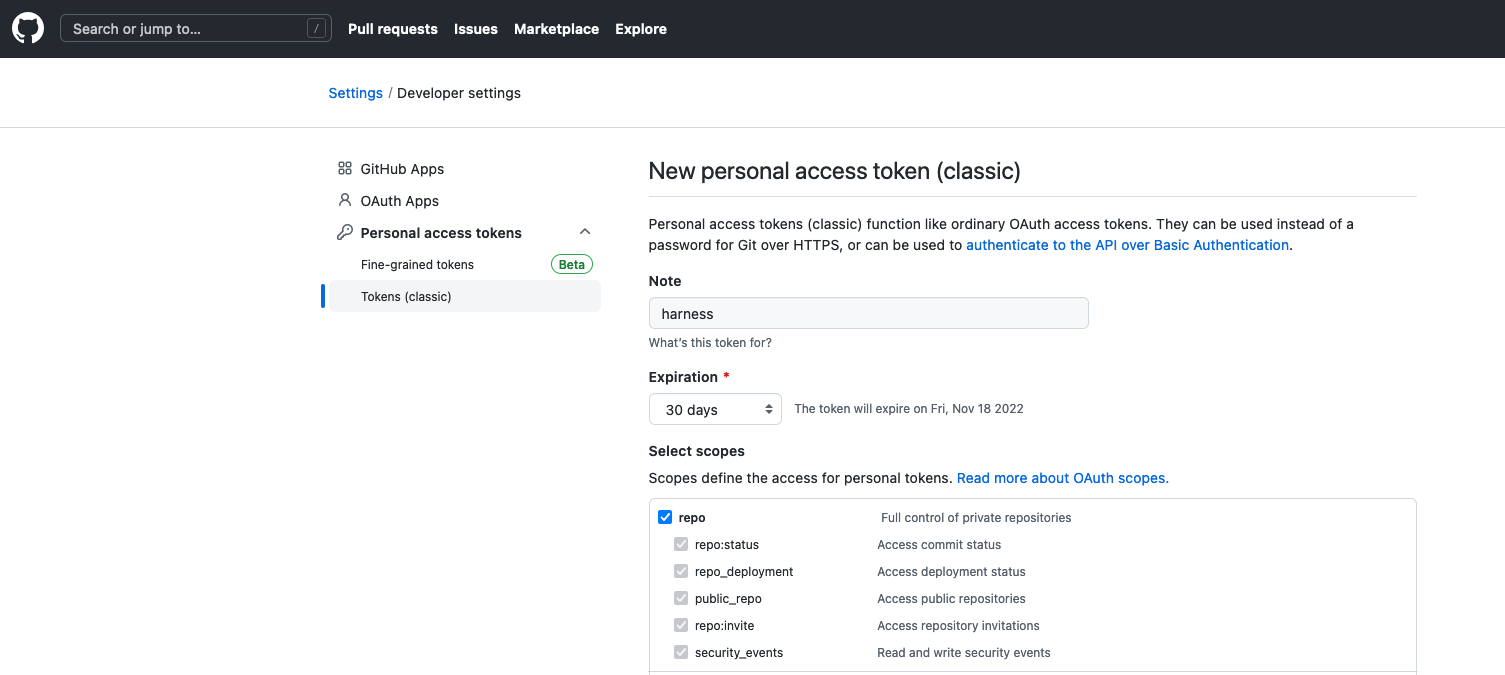
Copy the token so you can use it when you create the GitHub connector in the next steps.
In Harness, select the Continuous Integration module and then switch to the Project you want to use for this tutorial or create a project.
Create a project
Use these steps to create a project in your Harness account.
- Select Projects, select All Projects, and then select New Project.
- Enter a Name, such as
CI tutorials. - Leave the Organization as default.
- Select Save and Continue.
- On Invite Collaborators, you can add others to your project, if desired. You don't need to add yourself.
- Select Save and Continue.
- On the Modules page, select Continuous Integration, and then select Go to Module.
If this is your first project with CI, the CI pipeline wizard starts after you select Go to Module. You'll need to exit the wizard to create the GitHub connector.
Create the GitHub connector
Next, you'll create a connector that allows Harness to connect to your Git codebase. A connector is a configurable object that connects to an external resource automatically while the pipeline runs. For detailed instructions on creating GitHub connectors, go to Add a GitHub connector. For details about GitHub connector settings, go to the GitHub connector settings reference.
Under Project Setup, select Connectors.
Select New Connector, and then select GitHub under Code Repositories.
Enter a Name, and select Continue.
Configure the Details as follows, and then select Continue:
- URL Type: Select Repository.
- Connection Type: Select HTTP.
- GitHub Repository URL: Enter the URL to your fork of the tutorial repo.
Configure the Credentials as follows, and then select Continue:
- Username: Enter the username for the GitHub account where you forked the tutorial repo.
- Personal Access Token: Create a secret for the personal access token you created earlier. Harness secrets are safe; they're stored in the Harness Secret Manager. You can also use your own Secret Manager with Harness.
- Enable API access: Select this option and select the same personal access token secret.
For Select Connectivity Mode, select Connect through Harness Platform, and then select Save and Continue.
Wait while Harness tests the connection, and then select Finish.
Prepare the Docker registry
For this tutorial, you'll need a Docker connector to allow Harness to authenticate and publish the NodeJS app image to a Docker registry repository. This tutorial uses Docker Hub for the Docker registry, but you can use other Docker registries with Harness.
Create a Docker Hub account if you don't have one already.
Create a repo called
samplejsin your Docker Hub account.Create a Docker Hub personal access token with Read, Write, Delete permissions. Copy the token; you need it when you create the Docker Hub connector in the next steps.
In Harness, select the Continuous Integration module, and then select your project.
Under Project Setup, select Connectors.
Select New Connector, and then select Docker Registry.
Configure the Docker connector settings as follows:
- Name: Enter a name.
- Provider Type: Select Docker Hub.
- Docker Registry URL: Enter
https://index.docker.io/v2/. - Username: Enter the username for your Docker Hub account.
- Password: Create a secret for your Docker Hub personal access token.
- Select Connectivity Mode: Select Connect through Harness Platform.
- Select Save and Continue, wait for the connectivity test to run, and then select Finish.
In the list of connectors, make a note of your Docker connector's ID.
Create a pipeline
- Under Project Setup, select Get Started.
- When prompted to select a repository, search for easy-node-docker, select the repository that you forked earlier, and then select Configure Pipeline.
- Select Generate my Pipeline configuration, and then select Create a Pipeline.
Generate my Pipeline configuration automatically creates PR and Push triggers for the selected repository. If you want a more bare bones pipeline, select Create empty Pipeline configuration.
Generated pipeline YAML
The YAML for the generated pipeline is as follows. To switch to the YAML editor, select YAML at the top of the Pipeline Studio.
pipeline:
  name: Build easy-node-docker
  identifier: Build_easy_node_docker
  projectIdentifier: [your-project-ID]
  orgIdentifier: default
  stages:
    - stage:
        name: Build
        identifier: Build
        type: CI
        spec:
          cloneCodebase: true
          execution:
            steps:
              - step:
                  type: Run
                  name: Echo Welcome Message
                  identifier: Echo_Welcome_Message
                  spec:
                    shell: Sh
                    command: echo "Welcome to Harness CI"
          platform:
            os: Linux
            arch: Amd64
          runtime:
            type: Cloud
            spec: {}
  properties:
    ci:
      codebase:
        connectorRef: [your-GitHub-connector]
        repoName: [your-GitHub-account]/easy-node-docker
        build: <+input>
Understand the build infrastructure
If you inspect the pipeline you just created, you can see that it uses a Linux AMD64 machine on Harness Cloud build infrastructure. You can see this on the Build stage's Infrastructure tab in the visual editor, or in the stage's platform specification in the YAML editor.
    - stage:
        ...
        spec:
          cloneCodebase: true
          platform:
            os: Linux
            arch: Amd64
          runtime:
            type: Cloud
            spec: {}
You can change the build infrastructure if you want to use a different OS, arch, or infrastructure. With Harness Cloud build infrastructure, your builds run on pre-configured machines provided by Harness. You can also run builds locally or bring your own VMs or Kubernetes cluster build infrastructure. For more information on build infrastructure options, go to Which build infrastructure is right for me.
Regardless of the build infrastructure you choose, you must ensure that the build farm can run the commands required by your pipeline. For example, this tutorial uses tools that are publicly available through Docker Hub or already installed on Harness Cloud's preconfigured machines.
In contrast, if you choose to use a Kubernetes cluster build infrastructure and your pipeline requires a tool that is not already available in the cluster, you can configure your pipeline to load those prerequisite tools when the build runs. There are several ways to do this in Harness CI, including:
- Background steps for running dependent services.
- Plugin steps to run templated scripts, such as GitHub Actions, BitBucket Integrations, Drone plugins, and your own custom plugins.
- Various caching options to load dependency caches.
- Run steps for running all manner of scripts and commands.
You must ensure that the build farm can run the commands required by your build. You might need to modify your build machines or add steps to your pipeline to install necessary tools, libraries, and other dependencies.
Run tests
Add a step to run tests against the NodeJS app code. This portion of the tutorial uses a Run step to run tests in Harness CI. For more examples, go to Run a script in a Build stage.
- Visual
- YAML
In the Pipeline Studio, select the Build stage.
Remove the Echo Welcome Message step.
Select Add Step and add a Run step.
Enter a Name and optional Description.
Set the Shell type to Sh
Input
npmcommands to test the NodeJS code in the Command field, for example:npm install
npm run build --if-present
npm testSelect Apply Changes to save the step, and then select Save to save the pipeline.
This tutorial pipeline uses Harness Cloud build infrastructure that already has Node installed. If you changed the build infrastructure, you may need to specify the Container Registry and Image containing the binaries that the step needs to run your script, such as node:latest.
For information about when these fields are required, how to specify images, and information about all Run step settings, go to the Run step settings reference. For information about Harness Cloud image specifications and how to modify Harness Cloud build infrastructure, go to Platform and image specifications for Harness Cloud build infrastructure.
In the YAML editor, replace the Echo Welcome Message run step block with the following.
- step:
type: Run
name: Run tests
identifier: Run_tests
spec:
shell: Sh
command: |-
npm install
npm run build --if-present
npm test
This tutorial pipeline uses Harness Cloud build infrastructure that already has Node installed. If you changed the build infrastructure, you may need to specify the connectorRef and image containing the binaries that the step needs to run your script, such as node:latest.
The following example shows the same Run step with connectorRef and image.
- step:
type: Run
name: Run tests
identifier: Run_tests
spec:
connectorRef: [your-Docker-connector-ID]
image: node:latest
shell: Sh
command: |-
npm install
npm run build --if-present
npm test
For information about when these fields are required, how to specify images, and information about all Run step settings, go to the Run step settings reference. For information about Harness Cloud image specifications and how to modify Harness Cloud build infrastructure, go to Platform and image specifications for Harness Cloud build infrastructure.
Build and push to Docker Hub
Add a step to build an image of the NodeJS app and push it to Docker Hub. While this tutorial uses a Build and Push an image to Docker Registry step, Harness has a variety of options for building and uploading artifacts.
- Visual
- YAML
Add a Build and Push an image to Docker Registry step to the Build stage with the following configuration:
- Docker Connector: Select your Docker connector.
- Docker Repository: Enter
[your-Docker-Hub-username]/samplejs - Tags: Select Add and enter
<+pipeline.sequenceId>.
The Tag value is an expression that uses the build ID as the image tag. Each time the pipeline runs, the build ID increments, creating a unique image tag for each run.
Add the following step block to the Build stage. Replace the bracketed values with your Docker connector ID and your Docker Hub username.
- step:
type: BuildAndPushDockerRegistry
name: Build and Push an image to Docker Registry
identifier: BuildandPushanimagetoDockerRegistry
spec:
connectorRef: [your-Docker-connector-ID]
repo: [your-Docker-Hub-username]/samplejs
tags:
- <+pipeline.sequenceId>
The tag value is an expression that uses the build ID as the image tag. Each time the pipeline runs, the build ID increments, creating a unique image tag for each run.
Manage dependencies
Harness offers several options for managing dependencies. In addition to multiple caching options, you can use Background steps for services dependencies, and you can use Plugin steps and Run steps to install dependencies.
Use caching
Caching options include:
- Cache Intelligence
- S3 caching
- GCS caching
Because this tutorial pipeline uses Harness Cloud build infrastructure, you can leverage automatic caching with Cache Intelligence. To enable Cache Intelligence, switch to the YAML editor and add caching: enabled: true to the stage spec, for example:
- stage:
name: Build
identifier: Build
description: ""
type: CI
spec:
cloneCodebase: true
caching:
enabled: true
platform:
...
To use S3 caching in this tutorial pipeline, you can add a Restore Cache from S3 step to the beginning of the Build stage and add a Save Cache to S3 step to the end of the Build stage. You need an AWS connector to use S3 caching. For more information about configuring S3 cache steps, go to Save and Restore Cache from S3.
Node cache key and path requirements
All Node pipelines must include node_modules in the sourcePaths for your Save Cache to S3 step, for example:
spec:
sourcePaths:
- node_modules
If your pipeline uses npm, the key value must reference package-lock.json in your Save Cache to S3 and Restore Cache from S3 steps, for example:
spec:
key: cache-{{ checksum "package-lock.json" }}
If your pipeline uses yarn, the key value must reference yarn.lock in your Save Cache to S3 and Restore Cache from S3 steps, for example:
spec:
key: cache-{{ checksum "yarn.lock" }}
YAML example: S3 cache steps
Here's an example of a pipeline with Save and Restore S3 Cache steps:
steps:
- step:
type: RestoreCacheS3
name: Restore Cache From S3
identifier: Restore_Cache_From_S3
spec:
connectorRef: AWS_Connector
region: us-east-1
bucket: your-s3-bucket
key: cache-{{ checksum "package-lock.json" }}
archiveFormat: Tar
- step:
type: Run
...
- step:
type: BuildAndPushDockerRegistry
...
- step:
type: SaveCacheS3
name: Save Cache to S3
identifier: Save_Cache_to_S3
spec:
connectorRef: AWS_Connector
region: us-east-1
bucket: your-s3-bucket
key: cache-{{ checksum "package-lock.json" }}
sourcePaths:
- node_modules
archiveFormat: Tar
To use GCS caching in this tutorial pipeline, you can add a Restore Cache from GCS step to the beginning of the Build stage and add a Save Cache to GCS step to the end of the Build stage. You need a GCP connector to use GCS caching. For information about configuring GCS cache steps, go to Save and Restore Cache from GCS.
Node cache key and path requirements
All Node pipelines must include node_modules in the sourcePaths for your Save Cache to GCS steps, for example:
spec:
sourcePaths:
- node_modules
If your pipeline uses npm, the key value must reference package-lock.json in your Save Cache to GCS and Restore Cache from GCS steps, for example:
spec:
key: cache-{{ checksum "package-lock.json" }}
If your pipeline uses yarn, the key value must reference yarn.lock in your Save Cache to GCS and Restore Cache from GCS steps, for example:
spec:
key: cache-{{ checksum "yarn.lock" }}
YAML example: GCS cache steps
Here's an example of a pipeline with Save and Restore GCS Cache steps:
steps:
- step:
type: RestoreCacheGCS
name: Restore Cache From GCS
identifier: Restore_Cache_From_GCS
spec:
connectorRef: account.gcp
bucket: your-gcs-bucket
key: gcp-{{ checksum "package-lock.json" }}
archiveFormat: Tar
- step:
type: Run
...
- step:
type: BuildAndPushDockerRegistry
...
- step:
type: SaveCacheGCS
name: Save Cache to GCS
identifier: Save_Cache_to_GCS
spec:
connectorRef: account.gcp
bucket: your-gcs-bucket
key: gcp-{{ checksum "package-lock.json" }}
sourcePaths:
- node_modules
archiveFormat: Tar
Run the pipeline
- In the Pipeline Studio, save your pipeline and then select Run.
- In the Build Type field, select Git Branch, and then enter
mainin the Branch Name field. - Select Run Pipeline.
While the build runs you can observe each step of the pipeline execution on the Build details page.
If the build succeeds, you'll find your pushed image in your Docker Hub samplejs repo.
Do more with this pipeline
Now that you've created a basic pipeline for building and testing a NodeJS app, you might want to explore the ways that you can optimize and enhance CI pipelines, including:
- Using Terraform notification triggers to automatically start builds.
- Uploading artifacts to JFrog.
- Publishing Allure reports to the Artifacts tab..
- Including CodeCov code coverage and publishing results to your CodeCov dashboard.
- Updating Jira issues when builds run.
- Using variables.
- Deploying artifacts.
Use variables
Variables and expressions make your pipelines more versatile by allowing variable inputs and values. For example, you can add a pipeline-level variable that lets you specify a Docker Hub username when the pipeline runs.
- Visual
- YAML
To add a pipeline variable in the visual editor:
- In the Pipeline Studio, select Variables on the right side of the Pipeline Studio.
- Under Pipeline, select Add Variable.
- For Variable Name, enter
DOCKERHUB_USERNAME. - For Type select String, and then select Save.
- Enter the value
<+input>. This allows you to specify a Docker Hub username at runtime. - Select Apply Changes.
- Edit the Build and Push an image to Docker Registry step, and change the Docker Repository value to
<+pipeline.variables.DOCKERHUB_USERNAME>/samplejs. - Save and run the pipeline. You'll be prompted to provide a Docker Hub username before the pipeline runs.
To add a pipeline variable in the YAML editor:
- Add the following
variablesblock between thepropertiesandstagessections.
variables:
- name: DOCKERHUB_USERNAME
type: String
description: Your Docker Hub username
value: <+input>
- In the
BuildAndPushDockerRegistrystep, change therepovalue to<+pipeline.variables.DOCKERHUB_USERNAME>/samplejs. - Save and run the pipeline. You'll be prompted to provide a Docker Hub username before the pipeline runs.
Deploy artifacts
After building an artifact, you can deploy your artifact with Harness Continuous Delivery.
Reference: Pipeline YAML
Here is the complete YAML for this tutorial's pipeline. This pipeline:
- Hes steps that run tests and build the Node app.
- Uses Cache Intelligence.
- Uses the Harness Cloud build infrastructure.
If you copy this example, make sure to replace the bracketed values with corresponding values for your Harness project, GitHub connector ID, GitHub account name, and Docker connector ID.
Here is the complete YAML for this tutorial's pipeline. If you copy this example, make sure to replace the bracketed values with corresponding values for your Harness project ID, GitHub connector ID, GitHub account name, Docker connector ID, and Docker Hub username.
Pipeline YAML
pipeline:
name: nodejs-sample
identifier: nodejssample
projectIdentifier: [your-project-ID]
orgIdentifier: default
tags: {}
stages:
- stage:
name: Build Node App
identifier: Build_Node_App
description: ""
type: CI
spec:
cloneCodebase: true
caching:
enabled: true
platform:
os: Linux
arch: Amd64
runtime:
type: Cloud
spec: {}
execution:
steps:
              - step:
                  type: Run
                  name: Run tests
                  identifier: Run_tests
                  spec:
                    shell: Sh
                    command: |-
                      npm install
                      npm run build --if-present
                      npm test
- step:
type: BuildAndPushDockerRegistry
name: BuildAndPushDockerRegistry_1
identifier: BuildAndPushDockerRegistry_1
spec:
connectorRef: [your-Docker-connector-ID]
repo: [your-Docker-Hub-username]/samplejs
tags:
- <+pipeline.sequenceId>
properties:
ci:
codebase:
connectorRef: [your-GitHub-connector]
repoName: [your-GitHub-account]/easy-node-docker
build: <+input>