Snyk scanner reference
Harness STO supports the following scan types for the following Snyk products:
- Snyk Open Source —
orchestratedScanandingestionOnly - Snyk Code —
ingestionOnly - Snyk Container —
ingestionOnly
For a workflow description, go to Ingest Scan Results from Snyk.
Before you begin
To scan a container image, you must have Docker-in-Docker running as a background service in the stage where you're running the scan.
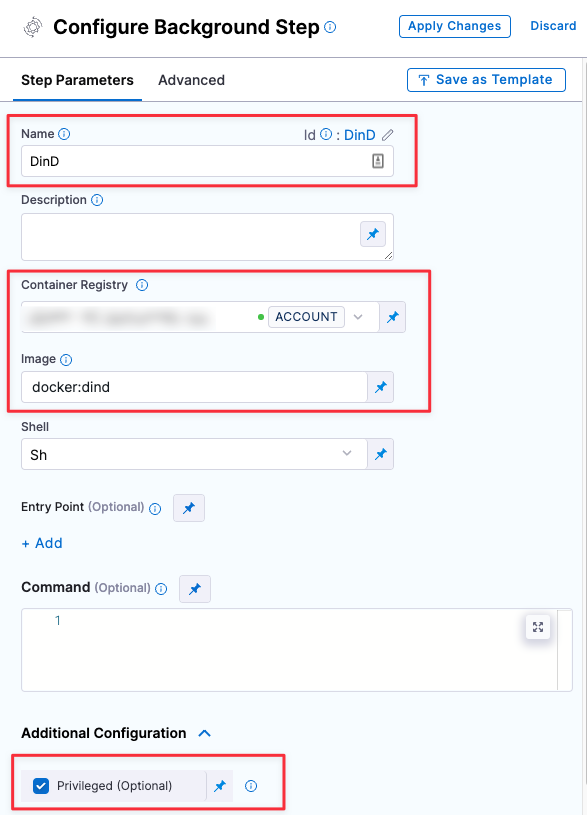
Set up a Docker-in-Docker background step
In the Execution tab, do the following:
- Click Add Step and then choose Background.
- Configure the Background step as follows:
- Dependency Name =
dind - Container Registry = The Docker connector to download the DinD image. If you don't have one defined, go to Docker connector settings reference.
- Image =
docker:dind - Under Optional Configuration, select the Privileged checkbox.
Snyk step configuration
The recommended workflow is add a Snyk step to a Security Tests or CI Build stage and then configure it as described below. You can also configure scans programmatically by copying, pasting, and editing the YAML definition.
- UI configuration support is currently limited to the following scanners: Aqua Trivy, Bandit, Black Duck, Checkmarx, Grype, Mend, Prisma Cloud, Snyk, SonarQube, and ZAP.
- Each step palette shows only the options that apply to a specific scan. If you're setting up a repository scan, for example, the UI won't show Container Image settings.
- Docker-in-Docker is not required for these steps unless you're scanning a container image. If you're scanning a repository using Bandit, for example, you don't need to set up a Background step running DinD.
- Support is currently limited to Kubernetes and Harness Cloud AMD64 build infrastructures only.
Step Palette
Scan
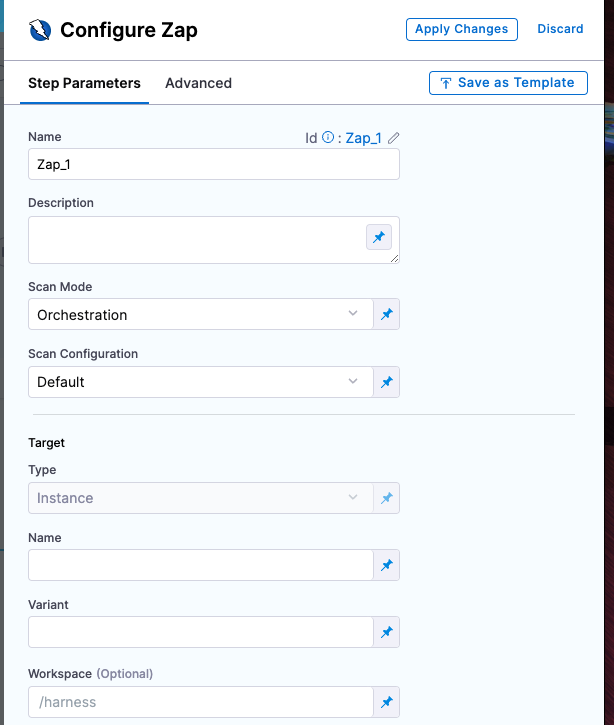
Scan Mode
The orchestration mode to use for the scan. The following list includes the UI and YAML values for the supported options.
- Orchestrated A fully-orchestrated scan. A Security step in the Harness pipeline orchestrates a scan and then normalizes and compresses the results.
- Extraction A partially-orchestrated scan. The Security step pulls scan results from an external SaaS service and then normalizes and compresses the data.
- Ingestion Ingestion scans are not orchestrated. The Security step ingest results from a previous scan (for a scan run in an previous step) and then normallizes and compresses the results.
Scan Configuration
The predefined configuration to use for the scan. All scan steps have at least one configuration.
Target
Type
The target type to scan for vulnerabilities.
- Repository Scan a codebase repo.
- Container Image Scan the layers, libraries, and packages in a container image.
Name
The Identifier that you want to assign to the target you’re scanning in the pipeline. Use a unique, descriptive name such as codebaseAlpha or jsmith/myalphaservice.
Variant
An identifier for a specific target to scan, such as the branch name or image tag. This identifier is used to differentiate or group results for a target. Harness maintains a historical trend for each variant.
Workspace (repository)
The workspace path on the pod running the Security step. The workspace path is /harness by default.
You can override this if you want to scan only a subset of the workspace. For example, suppose the pipeline publishes artifacts to a subfolder /tmp/artifacts and you want to scan these artifacts only. In this case, you can specify the workspace path as /harness/tmp/artifacts.
Ingestion File
The results data file to use when running an Ingestion scan. Generally an Ingestion scan consists of a scan step (to generate the data file) and an ingestion step (to ingest the data file).
Authentication
Access Token
The access token to log in to the scanner. In most cases this is a password or an API key.
You should create a Harness text secret with your encrypted token and reference the secret using the format <+secrets.getValue(project.container-access-id>. For more information, go to Add and Reference Text Secrets.
Log Level, CLI flags, and Fail on Severity
Log Level
The minimum severity of the messages you want to include in your scan logs. You can specify one of the following:
- DEBUG
- INFO
- WARNING
- ERROR
Fail on Severity
Every Security step has a Fail on Severity setting. If the scan finds any vulnerability with the specified severity level or higher, the pipeline fails automatically. You can specify one of the following:
CRITICALHIGHMEDIUMLOWINFONONE— Do not fail on severity
The YAML definition looks like this: fail_on_severity : critical # | high | medium | low | info | none
Additional Configuration
In the Additional Configuration settings, you can use the following options:
Advanced settings
In the Advanced settings, you can use the following options:
Security step configuration (deprecated)
Set up a Snyk scan in a Security step
You can set up Snyk scans using a Security step: create a CI Build or Security Tests stage, add a Security step, and then add the setting:value pairs as specified below.
Security step dialog box
Here's an example of how to set up a scan in a Security step. scan_type and policy_type are scanner-specific; the other settings are common to scans of container images.
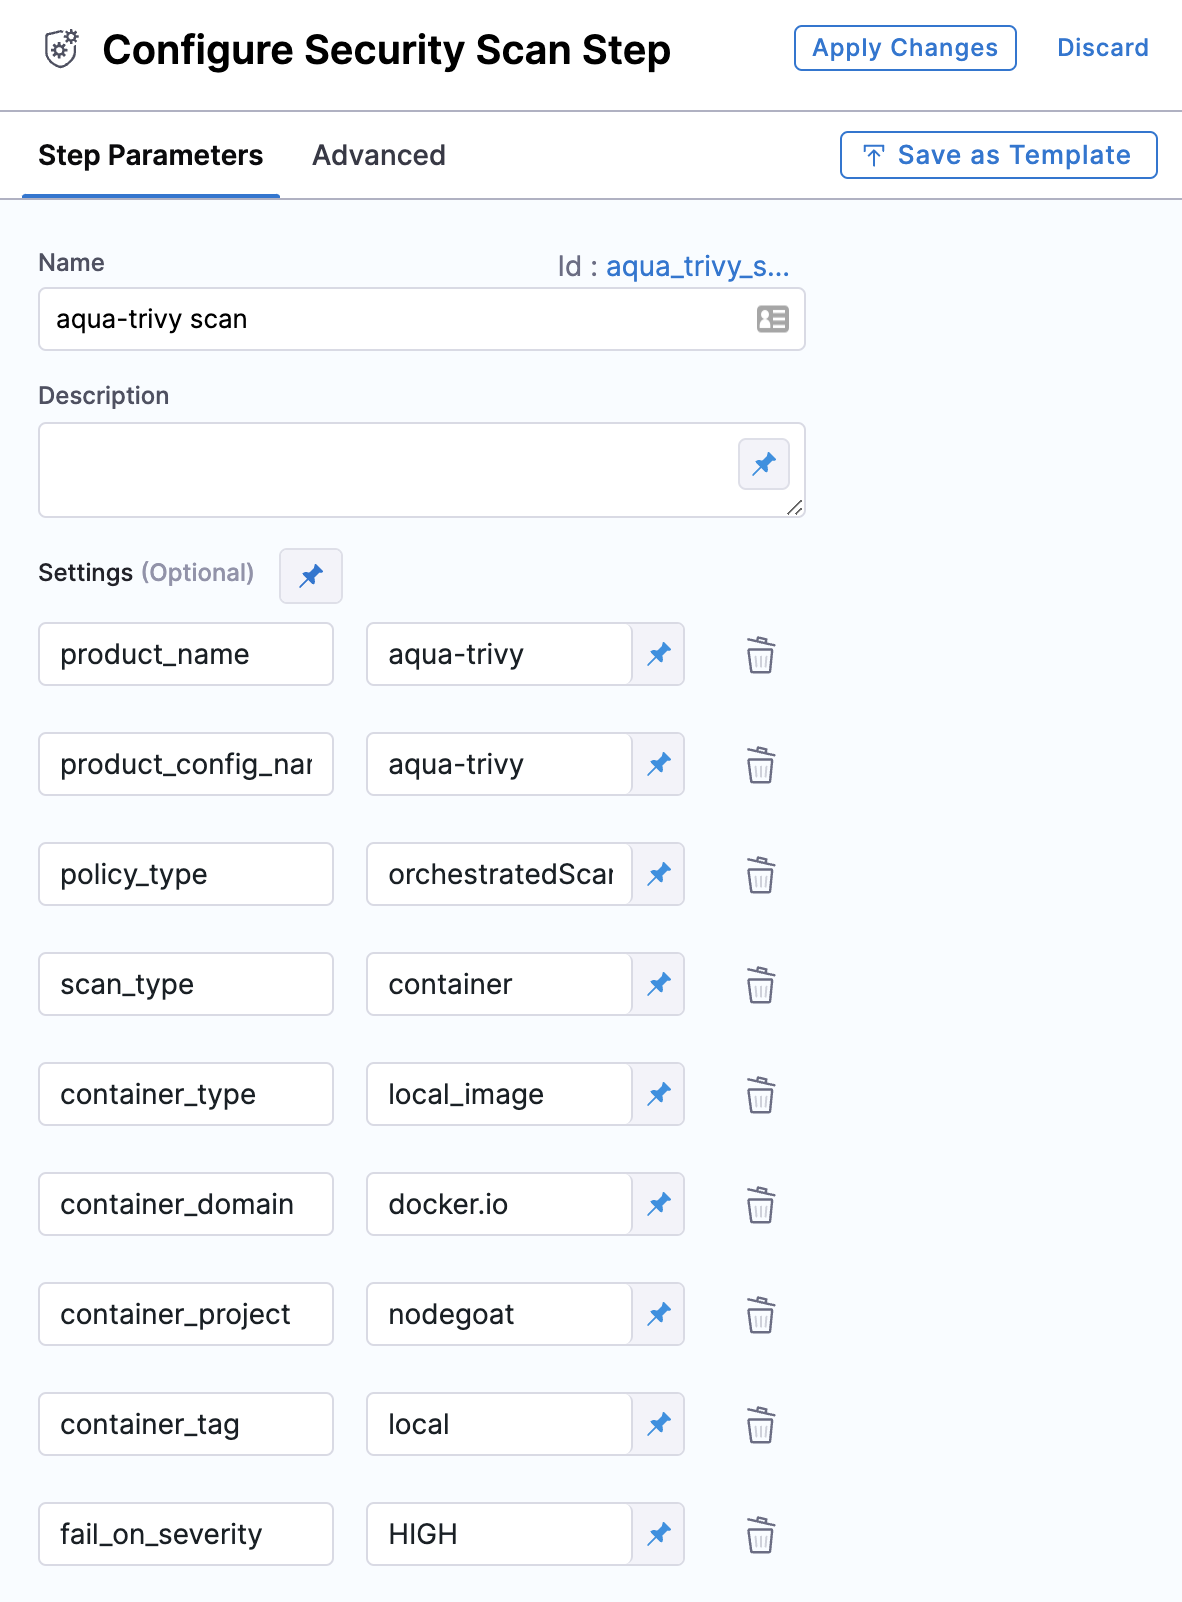
product_name=snyk:scan_type=containerImageorrepositorypolicy_type- accepted value for
containerImage:ingestionOnly - accepted values for
repository:orchestratedScan,ingestionOnly
- accepted value for
product_access_tokenproduct_config_name=defaultsnyk_api= URL to the Snyk instance, if you're using an on-prem installation.fail_on_severity- See Fail on Severity.
Container image scan settings
The following settings apply to all scanners where the scan_type is containerImage.
container_project(required)container_tag(required)container_type- accepted value(s):
local_image,docker_v2,jfrog_artifactory,aws_ecr- for
container_typeset tolocalNone
- for
container_typeset todocker_v2container_access_id: Usernamecontainer_access_token: Password/Token
- for
container_typeset tojfrog_artifactorycontainer_access_id: Usernamecontainer_access_token: Password/Token
- for
container_typeset toaws_ecrcontainer_access_id: Usernamecontainer_access_token: Password/Tokencontainer_region: AWS default region
- for
- accepted value(s):
container_domain
| Target Name | Target Type |
| local_image | container |
| docker_v2 | container |
| jfrog_artifactory | container |
| aws_ecr | container |
| website | instance |
Repository scan settings
The following settings apply to all scanners where the scan_type is repository.
repository_project(required)repository_branch(required)
| Target Name | Target Type |
| azure | repository |
| bitbucket | repository |
| github | repository |
| gitlab | repository |
Ingestion scan settings
The following settings are required for Security steps where the policy_type is ingestionOnly.
target nameThe Identifier that you want to assign to the target you’re scanning in the pipeline. Use a unique, descriptive name such as codebaseAlpha or jsmith/myalphaservice.variantAn identifier for a specific target to scan, such as the branch name or image tag. This identifier is used to differentiate or group results for a target. Harness maintains a historical trend for each variant.ingestion_fileThe results data file to use when running an Ingestion scan. You should specify the full path to the data file in your workspace, such as/shared/customer_artifacts/my_scan_results.json.
The following steps outline the general workflow for ingesting scan data into your pipeline:
Specify a shared folder for your scan results, such as
/shared/customer_artifacts. You can do this in the Overview tab of the Security stage where you're ingesting your data.Create a Run step that copies your scan results to the shared folder. You can run your scan externally, before you run the build, or set up the Run step to run the scan and then copy the results.
Add a Security step after the Run step and add the
target name,variant, andingestion_filesettings as described above.
For a complete workflow description and example, go to Ingest Scan Results into an STO Pipeline.
YAML configuration
The following YAML pipeline includes example stages for scanning a repository (Bandit step), an image (AquaTrivy step), and an app (ZAP step).
If you want to set up scan steps programmatically using YAML, the best practice is to set up your step in a pipeline using the Visual Editor and then copy, paste, and edit the YAML definition.
pipeline:
  name: sto-step-palette-example
  identifier: stosteppaletteexample
  projectIdentifier: my_sto_project
  orgIdentifier: default
  tags: {}
  properties:
    ci:
      codebase:
        connectorRef: MY_GITHUB_CONNECTOR
        build: <+input>
  stages:
    - stage:
        name: runSecurityTestsStage
        identifier: runSecurityTestsStage
        type: SecurityTests
        spec:
          cloneCodebase: true
          execution:
            steps:
              - step:
                  type: Background
                  name: docker_dind
                  identifier: Background_1
                  spec:
                    connectorRef: MY_DOCKER_CONNECTOR
                    image: docker:dind
                    shell: Sh
                    privileged: true
              - step:
                  type: Bandit
                  name: banditScanRepo
                  identifier: banditScanRepo
                  spec:
                    mode: orchestration
                    config: default
                    target:
                      name: dvpwa
                      type: repository
                      variant: <+codebase.branch>
                    advanced:
                      log:
                        level: info
                      fail_on_severity: none
              - step:
                  type: AquaTrivy
                  name: aquaTrivyScanContainerImage
                  identifier: aquaTrivyScanContainerImage
                  spec:
                    mode: orchestration
                    config: default
                    target:
                      name: myAlphaService
                      type: container
                      variant: latest
                    advanced:
                      log:
                        level: info
                    privileged: true
                    image:
                      type: docker_v2
                      name: jsmith/myalphaservice
                      domain: docker.io
                      tag: latest
              - step:
                  type: Zap
                  name: zapScanInstance
                  identifier: zapScanInstance
                  spec:
                    mode: orchestration
                    config: default
                    target:
                      name: my-gruyere
                      type: instance
                      variant: test
                    advanced:
                      log:
                        level: info
                    instance:
                      domain: https://google-gruyere.appspot.com/XXXXXXXXXXXXXXXXXXXXXXXXXXXXXXXXXXXXXXX/
                      protocol: https
          infrastructure:
            type: KubernetesDirect
            spec:
              connectorRef: MY_K8S_CONNECTOR
              namespace: harness-delegate-ng
              automountServiceAccountToken: true
              nodeSelector: {}
              os: Linux
          sharedPaths:
            - /var/run